PowerBoost 1000C
A LiPo charger and 5.2 V boost converter in one board, with load sharing, that runs a 5 V project from one lithium cell and keeps it running while charging.
- Output5.2 V nominal, dipping toward 5 V above 500 mA
- Output current1000 mA or more from a 3.7 V cell (2 A switch, about 2.5 A peak limit)
- Boost converterTI TPS61090, synchronous, 700 kHz
- Charge rateUp to 1000 mA from micro USB, with load sharing
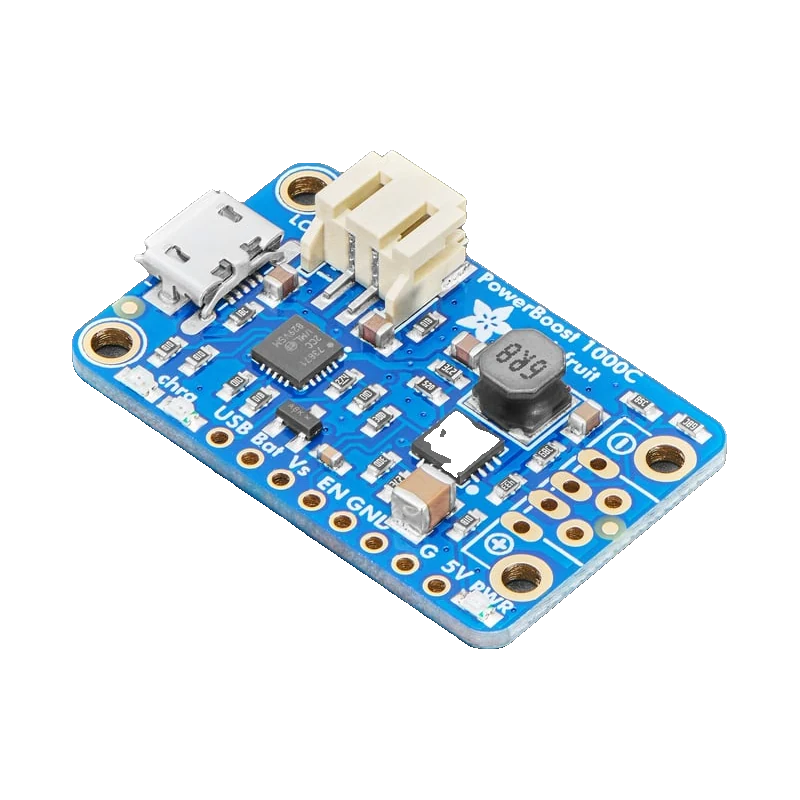
The PowerBoost 1000C turns one 3.7 V LiPo or Li-ion cell into 5.2 V at 1000 mA or more, using TI's TPS61090 boost converter with a 2 A switch, and charges the cell from micro USB at up to 1000 mA while still powering the load (Adafruit #2465 product page). Its LBO pin drops to 0 V when the battery falls below 3.2 V, but it is pulled up to the battery voltage, so it is not safe straight into a 3.3 V GPIO (Adafruit PowerBoost 1000C guide, Pinouts). Feed its 5V output to an Uno's 5V pin, an ESP32's VIN or a Pico's VSYS.
The board combines two jobs. A load-sharing charger takes 5 V from micro USB and charges the cell at up to 1000 mA, while passing power straight through to the load when USB is present; a TPS61090 boost converter then lifts the battery (or the USB-fed VS rail) to 5.2 V (Adafruit #2465). The extra 0.2 V leaves headroom for cable losses and a diode.
Adafruit rates the output at 1000 mA or more from a 3.7 V cell, thanks to the converter's 2 A internal switch with about 2.5 A peak limiting, at 90 % efficiency or better in most cases (#2465). The output sits near 5.2 V and can dip toward 5 V above 500 mA (guide, Pinouts).
Two control pins make it useful to a microcontroller. EN, pulled up to VS, turns the boost off completely when grounded, cutting the board to 20 µA (#2465). LBO, pulled up to the battery, goes to 0 V below 3.2 V and lights a red LED, so your sketch can save data and shut down (guide, Pinouts).
PowerBoost 1000C pinout
| Pin | Function | Type |
|---|---|---|
| USB | USB4.75 V to 5.25 V from micro USB | power out |
| BAT | Bat3.0 V to 4.2 V | power in |
| VS | Vs | power out |
| EN | EnablePulled up to VS | input |
| GND | GND | power out |
| VOUT | 5V5.2 V, 1000 mA+ | power out |
| LBO | Low battery (active low)Pulled up to BAT (up to 4.2 V) | output |
How to wire the PowerBoost 1000C
Pin by pin, for the board you have.
| PowerBoost 1000C | Arduino Uno | Note |
|---|---|---|
| VOUT | 5V | Unplug the Uno's USB while the PowerBoost feeds its 5V pin. |
| GND | GND | |
| LBO | D2 | Direct: LBO is at most 4.2 V, within the Uno's 5 V inputs. |
| BAT | A0 | Direct: 3.0 V to 4.2 V reads within the 5 V ADC range. |
- Check the LiPo connector's polarity before plugging in: some third-party cells are wired opposite and damage the board (guide, Pinouts).
- The 5V output is about 5.2 V, within what the Uno's 5 V parts tolerate.
| PowerBoost 1000C | ESP32 DevKit V1 | Note |
|---|---|---|
| VOUT | VIN | |
| GND | GND | |
| BAT | GPIO34 (D34) | Through a 100 kOhm / 100 kOhm divider: 4.2 V reads as 2.1 V. |
| LBO | not connected | It is pulled up to the battery (up to 4.2 V): read the battery voltage instead, or level-shift LBO. |
- Never wire LBO straight to an ESP32 pin: it rises to the battery voltage, above 3.3 V (guide, Pinouts).
- Never feed 5V into the 3V3 pin.
| PowerBoost 1000C | Raspberry Pi Pico | Note |
|---|---|---|
| VOUT | VSYS | Through a Schottky diode (anode at the PowerBoost) so USB can stay connected (Raspberry Pi Pico datasheet, p. 22). |
| GND | GND | |
| BAT | GP26 | Through a 100 kOhm / 100 kOhm divider: 4.2 V reads as 2.1 V. |
| LBO | not connected | Pulled up to the battery voltage; read BAT through the divider instead. |
- VSYS accepts up to 5.5 V (Pico datasheet, p. 9): the 5.2 V output is fine, the battery's charging input is not where it goes.
- Keep LBO off the Pico's pins unless you level-shift it.
PowerBoost 1000C code
Every example here compiles for its board.
// PowerBoost 1000C on Arduino Uno: wiring and a free simulation at https://www.tinkered.ai/components/powerboost-1000c
// PowerBoost 1000C powering an Arduino Uno via 5V: LBO on D2, BAT on A0 (direct).
const int LBO_PIN = 2;
const int BAT_PIN = A0;

void setup() {
  Serial.begin(115200);
  pinMode(LBO_PIN, INPUT); // the board pulls LBO up to the battery voltage
  Serial.println("PowerBoost 1000C battery monitor");
}

void loop() {
  // The ADC reference is the PowerBoost's 5.2 V output feeding the Uno, so allow a few % error
  float vbat = analogRead(BAT_PIN) * 5.0 / 1023.0;
  bool low = digitalRead(LBO_PIN) == LOW; // LOW below 3.2 V
  Serial.print("Battery: ");
  Serial.print(vbat, 2);
  Serial.println(low ? " V  LOW: save data and shut down" : " V");
  delay(2000);
}
// PowerBoost 1000C on ESP32 DevKit V1: wiring and a free simulation at https://www.tinkered.ai/components/powerboost-1000c
// PowerBoost 1000C powering an ESP32 DevKit V1 via VIN; battery read on GPIO34 through 100k/100k.
const int BAT_PIN = 34;
const float LOW_BAT = 3.2; // the PowerBoost's own low-battery threshold

void setup() {
  Serial.begin(115200);
  Serial.println("PowerBoost 1000C battery monitor");
}

void loop() {
  float vbat = analogReadMilliVolts(BAT_PIN) * 2.0 / 1000.0; // undo the 1:2 divider
  Serial.printf("Battery: %.2f V%s\n", vbat, vbat < LOW_BAT ? "  LOW: save data and shut down" : "");
  delay(2000);
}
// PowerBoost 1000C on Raspberry Pi Pico: wiring and a free simulation at https://www.tinkered.ai/components/powerboost-1000c
// PowerBoost 1000C powering a Raspberry Pi Pico via VSYS (Schottky diode); battery on GP26 through 100k/100k.
const int BAT_PIN = 26;
const float LOW_BAT = 3.2;

void setup() {
  Serial.begin(115200);
  analogReadResolution(12); // 0..4095 over 0..3.3 V
  Serial.println("PowerBoost 1000C battery monitor");
}

void loop() {
  float vbat = analogRead(BAT_PIN) * 3.3 / 4095.0 * 2.0; // undo the 1:2 divider
  Serial.print("Battery: ");
  Serial.print(vbat, 2);
  Serial.println(vbat < LOW_BAT ? " V  LOW: save data and shut down" : " V");
  delay(2000);
}
Before you wire it
- Use a single-cell 3.7 V LiPo or Li-ion battery with protection, and check its JST polarity first (guide, Pinouts).
- Take power for your project from the 5V pin; USB is the charging input, not an output (guide, Pinouts).
- Keep battery wires short, 3 inches or less (guide, Pinouts), because the boost draws more than the output current from the cell.
- Size the battery for the load: at 1 A out at 5.2 V, the cell supplies well over 1.4 A near 3.7 V.
- Never connect LBO directly to a 3.3 V GPIO: it is pulled up to the battery voltage (guide, Pinouts).
- Never tie LBO to EN to make an automatic cut-off; Adafruit says this does not work (guide, Pinouts).
- Never apply a voltage to the 5V pin while the board is disabled (guide, Pinouts).
- Never charge a damaged or swollen cell.
- With USB plugged in, VS carries about 5 V from USB and the load runs from it while the charger tops up the battery; without USB, VS follows the battery (guide, Pinouts).
- EN is a signal, not a power switch: a tiny slide switch to ground turns the output off and cuts the board to 20 µA (#2465).
- The USB data lines carry Apple-style divider resistors for a 1000 mA charge rate, so the board can act as a USB power bank once the USB-A socket is soldered on (guide, Pinouts).
- The 100 kOhm divider on 3.3 V boards draws about 21 µA from the cell; add a 100 nF capacitor across the lower resistor if readings jitter.
- Four LEDs show the state: blue for 5 V out, red for low battery, yellow while charging and green when charged (guide, Pinouts).
Specifications
- Output
- 5.2 V nominal, dipping toward 5 V above 500 mAAdafruit PowerBoost 1000C guide, Pinouts
- Output current
- 1000 mA or more from a 3.7 V cell (2 A switch, about 2.5 A peak limit)Adafruit PowerBoost 1000C (#2465) product page
- Boost converter
- TI TPS61090, synchronous, 700 kHzAdafruit PowerBoost 1000C (#2465) product page
- Charge rate
- Up to 1000 mA from micro USB, with load sharingAdafruit PowerBoost 1000C (#2465) product page
- Battery range
- 3.0 V (near empty) to 4.2 V (full) LiPo or Li-ionAdafruit PowerBoost 1000C guide, Pinouts
- Low battery output
- LBO falls to 0 V below 3.2 V; pulled up to BAT otherwise, not safe for 3.3 V GPIOs directlyAdafruit PowerBoost 1000C guide, Pinouts
- Enable
- EN pulled up to VS; ground it to disconnect the outputAdafruit PowerBoost 1000C guide, Pinouts
- Quiescent current
- 5 mA enabled with power LED on; 20 µA disabledAdafruit PowerBoost 1000C (#2465) product page
- Efficiency
- 90 % or better in most casesAdafruit PowerBoost 1000C (#2465) product page
From the Adafruit PowerBoost 1000C guide, published by Adafruit (TI TPS61090 boost converter).
Common mistakes
Powering the project from the USB pin
The USB pin is the micro USB charging input; with no cable it is dead. Take the project's power from 5V (guide, Pinouts).
LBO into an ESP32 or Pico pin
LBO is pulled up to the battery, up to 4.2 V. Adafruit warns it is not suitable for 3.3 V GPIOs (guide, Pinouts); read the battery through a divider instead.
Reversed battery connector
Some third-party LiPo cells use the opposite JST polarity and destroy the board when plugged in (guide, Pinouts). Check red to + before connecting.
Brown-outs at high current
Above 500 mA the output sags toward 5 V (guide, Pinouts), and a tired cell sags further. Keep battery leads short and the cell healthy, and watch the low-battery signal.
PowerBoost 1000C questions
PowerBoost 1000C or TP4056 with a boost module?
The PowerBoost 1000C does both jobs on one board with load sharing, so the project keeps running while it charges, and it has enable and low-battery pins (Adafruit #2465). A TP4056 plus an MT3608 is cheaper but needs care to avoid powering the load through the charger.
Can the PowerBoost 1000C power a Raspberry Pi?
A low-power Pi, yes: Adafruit rates it at 1000 mA or more (#2465). Larger Pi models need more than it can supply.
How do I read the battery level?
On a 5 V board read BAT directly on an analog pin; on a 3.3 V board use a 1:2 resistor divider. LBO also drops to 0 V below 3.2 V (guide, Pinouts).
Can I run my project while charging?
Yes, that is load sharing: with USB plugged in, the load runs from USB while the cell charges at up to 1000 mA (Adafruit #2465).
Build something with the PowerBoost 1000C
- Build this
Portable weather station
Run an ESP32 sensor node from a LiPo and charge it from USB.
- Build this
Handheld game
Battery-powered game console with a low-battery warning.
- Build this
USB power bank with monitor
A power bank that reports its charge.
This page as plain Markdown, for ChatGPT, Claude or your own agent. /components/powerboost-1000c.md