MG90S
A 13.4 g micro servo with metal gears, turning about 180° under a 50 Hz pulse signal with 1.8 to 2.2 kgf·cm of torque.
- Weight13.4 g
- Stall torque1.8 kgf·cm at 4.8 V; 2.2 kgf·cm at 6.6 V
- Speed0.10 s/60° at 4.8 V; 0.08 s/60° at 6.0 V
- Operating voltage4.8 V nominal (speed rated up to 6.0 V)
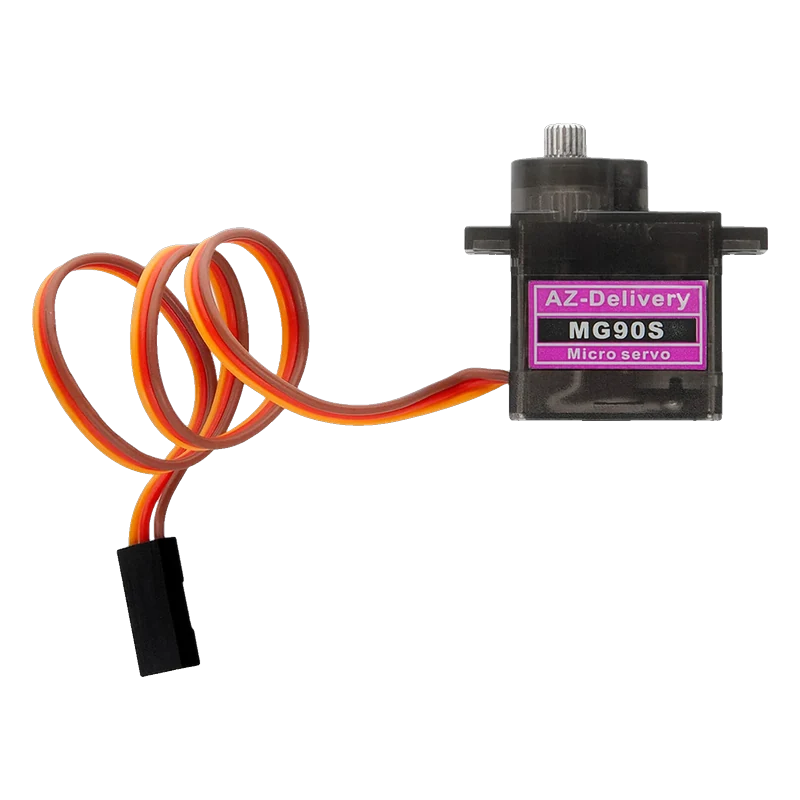
The MG90S is TowerPro's metal-gear micro servo: 13.4 g, 1.8 kgf·cm of stall torque at 4.8 V and 2.2 kgf·cm at 6.6 V, 0.10 s per 60° at 4.8 V (TowerPro MG90S product page). It has three wires: brown to GND, red to a 4.8 V to 6 V supply, orange to a PWM pin sending 50 Hz pulses. Power it from its own 5 V supply rather than the board's pin, and join the grounds.
The MG90S has the same size and connector as the plastic-geared SG90 but with metal gears, so it survives knocks and stalls that strip an SG90, and holds about 1.8 kgf·cm at 4.8 V (TowerPro product page). That makes it the usual upgrade for robot arms, pan-tilt heads, RC control surfaces and small walking robots.
Position is set by the width of a pulse repeated every 20 ms: around 1 ms at one end, 1.5 ms in the middle and 2 ms or a little more at the other end, with the exact range varying between units. The Servo library on the Uno and Pico, and ESP32Servo on the ESP32, generate these pulses on any pin.
A servo motor draws its biggest current when it starts or stalls, and those spikes are what reset microcontrollers. Give servos their own 5 V or 6 V supply (four NiMH cells, a 5 V regulator or a UBEC), tie its ground to the board's ground, and add a capacitor across the servo supply.
MG90S pinout
| Pin | Function | Type |
|---|---|---|
| GND | Brown | power in |
| VCC | Red4.8 V to 6 V | power in |
| SIG | PWM | input |
How to wire the MG90S
Pin by pin, for the board you have.
| MG90S | Arduino Uno | Note |
|---|---|---|
| SIG | D9 | |
| VCC | External 5 V to 6 V supply + | 470 µF electrolytic across the servo supply, close to the servo. |
| GND | External supply - and Uno GND |
- One MG90S moving without load can run from the Uno's 5V pin for a test, but stalls and several servos reset the board: use a separate supply.
- The Servo library disables analogWrite on D9 and D10 while it runs.
| MG90S | ESP32 DevKit V1 | Note |
|---|---|---|
| SIG | GPIO18 (D18) | 3.3 V pulses drive most hobby servos directly. |
| VCC | External 5 V to 6 V supply + | 470 µF electrolytic across the servo supply. |
| GND | External supply - and ESP32 GND |
- Never power the servo from the 3V3 pin; use an external 5 V to 6 V supply and share ground.
- If the servo jitters, it may need a 5 V signal: add a logic level converter on SIG.
| MG90S | Raspberry Pi Pico | Note |
|---|---|---|
| SIG | GP15 | |
| VCC | External 5 V to 6 V supply + | 470 µF electrolytic across the servo supply. |
| GND | External supply - and Pico GND |
- VBUS can run one lightly loaded servo for a test from a good USB port, but use an external supply for real loads and never the 3V3(OUT) pin.
MG90S code
Every example here compiles for its board.
// MG90S on Arduino Uno: wiring and a free simulation at https://www.tinkered.ai/components/mg90s
// MG90S on an Arduino Uno: signal D9, servo powered from an external 5 V supply, grounds joined
#include <Servo.h>

Servo servo;
const int SERVO_PIN = 9;

void setup() {
  Serial.begin(115200);
  servo.attach(SERVO_PIN, 544, 2400); // pulse range in microseconds
  servo.write(90);
  Serial.println("MG90S centred at 90 degrees");
  delay(1000);
}

void loop() {
  for (int angle = 0; angle <= 180; angle += 45) {
    servo.write(angle);
    Serial.print("Angle: ");
    Serial.println(angle);
    delay(800);
  }
  for (int angle = 180; angle >= 0; angle -= 45) {
    servo.write(angle);
    Serial.print("Angle: ");
    Serial.println(angle);
    delay(800);
  }
}
// MG90S on ESP32 DevKit V1: wiring and a free simulation at https://www.tinkered.ai/components/mg90s
// MG90S on an ESP32 DevKit V1: signal GPIO18, servo powered from an external 5 V supply, grounds joined
#include <ESP32Servo.h>

Servo servo;
const int SERVO_PIN = 18;

void setup() {
  Serial.begin(115200);
  servo.setPeriodHertz(50);           // standard 50 Hz servo frame
  servo.attach(SERVO_PIN, 544, 2400); // pulse range in microseconds
  servo.write(90);
  Serial.println("MG90S centred at 90 degrees");
  delay(1000);
}

void loop() {
  for (int angle = 0; angle <= 180; angle += 45) {
    servo.write(angle);
    Serial.printf("Angle: %d\n", angle);
    delay(800);
  }
  for (int angle = 180; angle >= 0; angle -= 45) {
    servo.write(angle);
    Serial.printf("Angle: %d\n", angle);
    delay(800);
  }
}
// MG90S on Raspberry Pi Pico: wiring and a free simulation at https://www.tinkered.ai/components/mg90s
// MG90S on a Raspberry Pi Pico (arduino-pico, built-in Servo library): signal GP15, external 5 V supply
#include <Servo.h>

Servo servo;
const int SERVO_PIN = 15;

void setup() {
  Serial.begin(115200);
  servo.attach(SERVO_PIN, 544, 2400); // pulse range in microseconds
  servo.write(90);
  Serial.println("MG90S centred at 90 degrees");
  delay(1000);
}

void loop() {
  for (int angle = 0; angle <= 180; angle += 45) {
    servo.write(angle);
    Serial.print("Angle: ");
    Serial.println(angle);
    delay(800);
  }
  for (int angle = 180; angle >= 0; angle -= 45) {
    servo.write(angle);
    Serial.print("Angle: ");
    Serial.println(angle);
    delay(800);
  }
}
Before you wire it
- Power servos from their own 4.8 V to 6 V supply and join its ground to the board's GND.
- Put a 470 µF or larger electrolytic capacitor across the servo supply to absorb start-up spikes.
- Find the real end stops of your unit by sweeping slowly with writeMicroseconds(); stop before the gears buzz against the end.
- Keep the signal wire short or twisted with ground when the servo is far from the board.
- Never power a servo from a 3.3 V pin.
- Never hold a servo stalled against an obstacle: it draws its highest current and heats up even with metal gears.
- Never exceed 6 V on the red wire; TowerPro rates its speed up to 6.0 V (product page).
- Never turn the horn by hand while powered: you fight the motor and can strip the gear train.
- The signal is a pulse every 20 ms (50 Hz). The Arduino Servo library maps 0° to 180° onto 544 µs to 2400 µs by default; use attach(pin, min, max) to match your servo's actual travel.
- A 1 µs dead band (TowerPro product page) means small pulse changes produce movement, so a noisy signal or a jittery timer shows up as buzzing.
- At 6 V the servo is faster (0.08 s/60°) and stronger than at 4.8 V (product page); a 5 V supply sits between the two.
- With several servos, a PCA9685 driver board frees the microcontroller from pulse timing and keeps every channel steady.
Specifications
- Weight
- 13.4 gTowerPro MG90S product page
- Stall torque
- 1.8 kgf·cm at 4.8 V; 2.2 kgf·cm at 6.6 VTowerPro MG90S product page
- Speed
- 0.10 s/60° at 4.8 V; 0.08 s/60° at 6.0 VTowerPro MG90S product page
- Operating voltage
- 4.8 V nominal (speed rated up to 6.0 V)TowerPro MG90S product page
- Dead band
- 1 µsTowerPro MG90S product page
- Temperature range
- 0 to 55 °CTowerPro MG90S product page
- Gears
- MetalTowerPro MG90S product page
From the TowerPro MG90S product page, published by TowerPro.
Common mistakes
Board resets when the servo moves
Start-up and stall currents pull the board's 5 V rail down. Feed the servo from a separate supply with a large capacitor, and join only the grounds.
Forgetting the common ground
With a separate supply but no ground link, the signal has no reference and the servo twitches randomly or not at all. Connect the supply's minus to the board's GND.
Grinding at the end stops
Not every MG90S reaches a full 180° on the same pulses. If it buzzes at 0° or 180°, narrow the attach() range until it stops cleanly.
Expecting continuous rotation
The standard MG90S turns about 180°. A 360° continuous version exists with the same name plus '360'; it takes speed, not angle, from the same pulses.
MG90S questions
MG90S vs SG90: what is the difference?
The MG90S has metal gears, giving 1.8 kgf·cm at 4.8 V (TowerPro product page) and much better survival in stalls and crashes. The SG90 has plastic gears and weighs a few grams less. They share the same size, mounting and three-wire connector.
What voltage does the MG90S need?
4.8 V nominal, with TowerPro rating its speed up to 6.0 V (product page). A 5 V regulated supply or four NiMH cells works well; keep the signal at your board's logic level.
Can an ESP32 or Pico control an MG90S?
Yes. Use ESP32Servo on the ESP32 or the built-in Servo library on the Pico; most hobby servos read a 3.3 V pulse. Power the servo from an external 5 V supply and share ground.
Which wire is which on the MG90S?
Brown is ground, red is positive supply and orange is the signal. The connector is the standard three-pin servo plug, so it fits servo headers and PCA9685 boards directly.
Why does my MG90S jitter?
Usually a weak supply or a missing capacitor, sometimes a noisy signal. The 1 µs dead band (TowerPro product page) makes it react to tiny pulse changes, so give it a solid 5 V supply with 470 µF and a short signal wire.
Build something with the MG90S
- Build this
Pan-tilt camera mount
Aim a camera with two servos from a joystick.
- Build this
Robot arm
A four-axis desktop arm with metal-gear servos.
- Build this
Automatic cat feeder
Open a food hatch on a schedule.
This page as plain Markdown, for ChatGPT, Claude or your own agent. /components/mg90s.md