Arduino UNO R4 Minima
The UNO form factor with a 48 MHz Arm Cortex-M4, 5 V I/O, USB-C and a 6 to 24 V barrel jack.
- MicrocontrollerRenesas RA4M1 (R7FA4M1AB3CFM#AA0), Arm Cortex-M4 with FPU at 48 MHz
- Memory256 kB flash, 32 kB SRAM, 8 kB data flash (EEPROM)
- I/O voltage5 V on every pin except the 3.3V pin
- VIN / barrel jack6 V to 24 V, 7 V typical
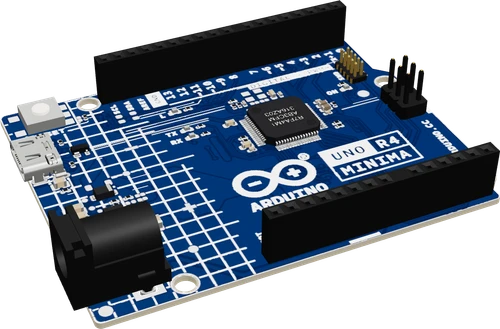
The Arduino UNO R4 Minima is an UNO-shaped board with a Renesas RA4M1, a 48 MHz Arm Cortex-M4 with 256 kB flash and 32 kB SRAM, and 5 V I/O that keeps UNO shields working (Arduino ABX00080 datasheet, p. 1). Power it from USB-C at 5 V or 6 to 24 V on the barrel jack or VIN (p. 6), wire parts to D0 to D13 and A0 to A5 as on an UNO R3, and keep each pin under 8 mA (p. 11).
The UNO R4 Minima (SKU ABX00080) is the first UNO with a 32-bit microcontroller. Its Renesas RA4M1 runs an Arm Cortex-M4 with a floating point unit at 48 MHz, with 256 kB of flash, 32 kB of SRAM and 8 kB of data flash used as EEPROM (UNO R4 Minima datasheet, pp. 1, 9): eight times the flash and sixteen times the SRAM of the earlier UNO (p. 5). The operating voltage stays at 5 V, so shields designed for previous UNO revisions keep working (p. 1).
The headers match the UNO R3: 14 digital I/O, six marked for PWM (D3, D5, D6, D9, D10, D11), and six analog inputs A0 to A5 (p. 2). The analog side is a clear upgrade, with an ADC of up to 14 bits, a DAC of up to 12 bits on A0 and an op-amp on A1 to A3 (pp. 2, 13). The board adds a CAN controller on D4/D5 (it needs an external transceiver), a USB-C port with native USB, an SWD debug connector and the usual ICSP header (pp. 2, 14).
The Minima is the bare version of the R4: no Wi-Fi module, no LED matrix and no Qwiic connector, which the UNO R4 WiFi adds. Power comes from USB-C or from 6 V to 24 V on the barrel jack or VIN through an ISL854102 buck converter, with Schottky diodes for reverse polarity and overvoltage protection (pp. 2, 10). The main thing to plan around is current: each RA4M1 GPIO is rated for 8 mA (p. 11).
Arduino UNO R4 Minima pinout
| Pin | Function | Type |
|---|---|---|
| D0 | UART RX, PWM, Digital5 V | bidirectional |
| D1 | UART TX, PWM, Digital5 V | bidirectional |
| D2 | PWM, Digital5 V | bidirectional |
| D3 | PWM, Digital5 V | bidirectional |
| D4 | PWM, Digital5 V | bidirectional |
| D5 | PWM, Digital5 V | bidirectional |
| D6 | PWM, Digital5 V | bidirectional |
| D7 | PWM, Digital5 V | bidirectional |
| D8 | PWM, Digital5 V | bidirectional |
| D9 | PWM, Digital5 V | bidirectional |
| D10 | PWM, SPI CS, Digital5 V | bidirectional |
| D11 | PWM, SPI COPI, Digital5 V | bidirectional |
| D12 | PWM, SPI CIPO, Digital5 V | bidirectional |
| D13 | PWM, SPI SCK, Digital5 V | bidirectional |
| SDA | I2C SDA, Digital5 V | bidirectional |
| SCL | I2C SCL, Digital5 V | bidirectional |
| A0 | ADC, Digital5 V | bidirectional |
| A1 | ADC, Digital5 V | bidirectional |
| A2 | ADC, Digital5 V | bidirectional |
| A3 | ADC, Digital5 V | bidirectional |
| A4 | ADC, I2C SDA, PWM, Digital5 V | bidirectional |
| A5 | ADC, I2C SCL, PWM, Digital5 V | bidirectional |
| BOOT | BOOT | input |
| IOREF | IOREF | power out |
| RESET | Digital5 V | input |
| 3V3 | 3.3V3.3 V | power out |
| 5V | 5V5 V | power out |
| GND | GND | power in |
| GND3 | GND | power in |
| VIN | VIN | power in |
| GND2 | GND | power in |
| AREF | AREF | input |
Specifications
- Microcontroller
- Renesas RA4M1 (R7FA4M1AB3CFM#AA0), Arm Cortex-M4 with FPU at 48 MHzArduino UNO R4 Minima datasheet (ABX00080), pp. 1, 9
- Memory
- 256 kB flash, 32 kB SRAM, 8 kB data flash (EEPROM)Arduino UNO R4 Minima datasheet, p. 1
- I/O voltage
- 5 V on every pin except the 3.3V pinArduino UNO R4 Minima datasheet, p. 11
- VIN / barrel jack
- 6 V to 24 V, 7 V typicalArduino UNO R4 Minima datasheet, p. 6
- USB-C input
- 4.8 V to 5.5 V; about 4.7 V reaches the MCU after the Schottky dropArduino UNO R4 Minima datasheet, pp. 6, 10
- Current per GPIO
- 8 mAArduino UNO R4 Minima datasheet, p. 11
- Digital I/O
- 14 pins, PWM marked on D3, D5, D6, D9, D10, D11Arduino UNO R4 Minima datasheet, pp. 2, 5
- Analog
- 6 inputs A0 to A5, up to 14-bit ADC; up to 12-bit DAC on A0; op-amp on A1 (+), A2 (-), A3 (out)Arduino UNO R4 Minima datasheet, pp. 2, 13
- Buses
- 1 UART (D0/D1), 1 SPI (D10 to D13, ICSP), 1 I2C (A4/A5, SDA/SCL), 1 CAN (D4/D5, external transceiver)Arduino UNO R4 Minima datasheet, p. 2
- Operating temperature
- -40 °C to +85 °CArduino UNO R4 Minima datasheet, p. 6
- Logic level
- 5 V
- Clock speed
- 48 MHz
- Flash
- 256 KB
- RAM
- 32 KB
- GPIO pins
- 20
- ADC channels
- 6
- ADC resolution
- 14 bits
- PWM channels
- 6Arduino UNO R4 Minima datasheet (ABX00080)
- Dimensions
- 68.58 × 15.5 × 53.34 mm
- Weight
- 22 g
From the Arduino's datasheet, published by Arduino.
Common mistakes
Treating pins like an UNO R3's
The RA4M1's pins are rated for 8 mA (UNO R4 Minima datasheet, p. 11), lower than the classic ATmega328P boards. A 220 Ω LED resistor or a relay coil on a pin is too much: use larger resistors and a transistor for anything heavier.
Looking for Wi-Fi, the LED matrix or Qwiic
Those belong to the UNO R4 WiFi. The Minima has no radio, no matrix and no Qwiic connector: wire I2C parts to A4/A5 or the SDA/SCL header pins.
Expecting a DAC on every analog pin
Only A0 has the DAC (p. 10). analogWrite on other pins gives PWM, and A1 to A3 double as the op-amp's inputs and output (p. 13).
Wiring CAN without a transceiver
D4 and D5 carry the CAN controller's logic signals, not a bus (p. 2). Connect them to a CAN transceiver, and the transceiver to CANH and CANL.
Using AVR register code
Sketches that write PORTB, DDRD or use avr/ headers for speed were written for the ATmega328P. On the R4 use digitalWrite and the core's libraries, or port the code to the RA4M1.
Arduino UNO R4 Minima questions
What is the difference between the UNO R4 Minima and the UNO R3?
Same shape, headers and 5 V logic, but the R4 Minima runs a 48 MHz Cortex-M4 with 256 kB flash and 32 kB SRAM against the R3's 16 MHz ATmega328P with 32 kB flash and 2 kB SRAM (UNO R4 Minima datasheet, p. 1; UNO R3 datasheet, p. 2). It adds a 14-bit ADC, a 12-bit DAC, CAN, an op-amp, USB-C and a 6 V to 24 V input (pp. 2, 6). The trade-off is 8 mA per pin (p. 11).
UNO R4 Minima or UNO R4 WiFi?
Both use the same RA4M1 and 5 V headers. The WiFi model adds an ESP32-S3 module for Wi-Fi and Bluetooth LE, a 12 × 8 LED matrix and a Qwiic connector (UNO R4 WiFi datasheet, pp. 1, 12, 14). Choose the Minima when the project needs none of those.
Is the UNO R4 Minima 5 V or 3.3 V?
5 V. Every header pin runs at 5 V except the 3.3V supply pin (UNO R4 Minima datasheet, p. 11), so 5 V UNO shields work. 3.3 V-only modules need a level shifter.
Why won't my UNO R4 Minima upload?
Install the Arduino UNO R4 Boards package, select UNO R4 Minima and use a USB-C cable that carries data. If a sketch has locked up the board, double-tap the reset button right after power-up to enter the bootloader, then upload again (UNO R4 Minima datasheet, p. 16).
How much current can an UNO R4 Minima pin drive?
8 mA per GPIO (UNO R4 Minima datasheet, p. 11). That covers an LED with a 390 Ω or larger resistor or a transistor's input, not a relay coil, a motor or a buzzer driven directly.
What power supply can I use with the UNO R4 Minima?
6 V to 24 V on the barrel jack or VIN, 7 V typical, or 5 V through USB-C (UNO R4 Minima datasheet, p. 6). A 9 V or 12 V adapter is fine, and the input is protected against reverse polarity by Schottky diodes (p. 10).
Build something with the Arduino UNO R4 Minima
- Build this
Shield-based upgrade
Keep an existing 5 V UNO shield and gain a 32-bit core, more memory and a 14-bit ADC.
- Build this
DAC waveform generator
Output audio tones or test waveforms from the 12-bit DAC on A0.
- Build this
CAN bus node
Add a transceiver to D4/D5 to read or command devices on a CAN network.
- Build this
USB keyboard or MIDI controller
Use the RA4M1's native USB to make the board appear as a keyboard, mouse or MIDI device.
- Build this
Precision sensor logger
Read thermistors, load cells or analog sensors at 14-bit resolution and log them over USB serial.
This page as plain Markdown, for ChatGPT, Claude or your own agent. /components/arduino-uno-r4-minima.md