Arduino Leonardo
An Uno-sized Arduino on the ATmega32U4, whose native USB lets it act as a USB keyboard, mouse or serial port.
- MicrocontrollerATmega32U4, 8-bit AVR at 16 MHz
- Memory32 KB flash (28,672 bytes for sketches after the 4 KB bootloader), 2.5 KB SRAM, 1 KB EEPROM
- USBNative full-speed USB 2.0 device in the chip, micro USB connector; no separate USB-serial chip
- I/O voltage5 V logic; IOREF reads 5 V
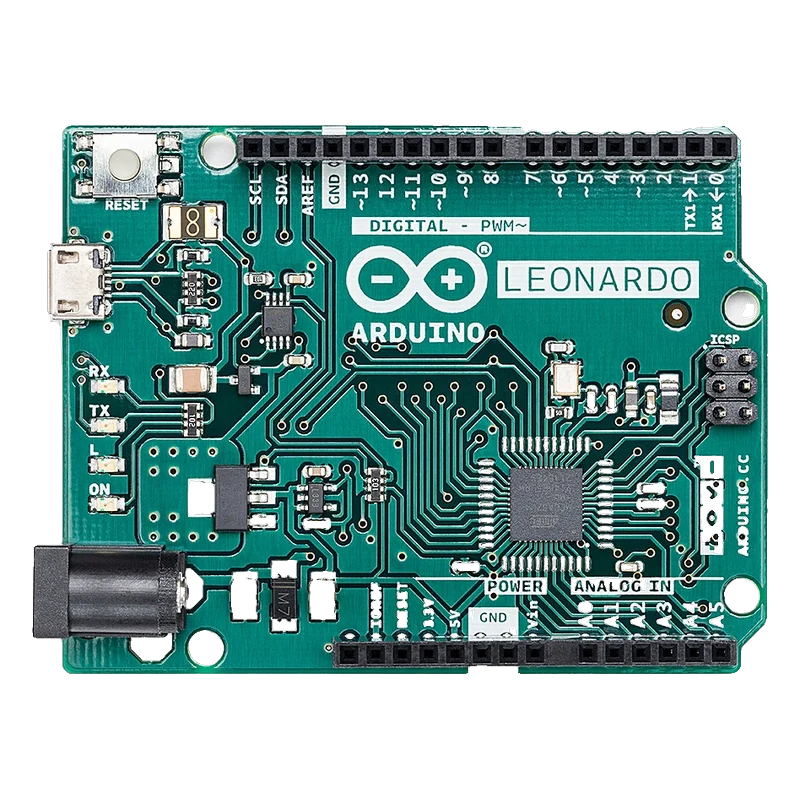
The Arduino Leonardo is an Uno-shaped board built on the ATmega32U4 at 16 MHz, with 32 KB of flash, 2.5 KB of SRAM and 5 V I/O (Arduino tech specs). The chip talks USB itself, so the board can type and move the mouse as a USB keyboard or mouse; Serial is that USB port, and the D0/D1 pins are Serial1 (Arduino Leonardo and Micro guide). It has 20 digital pins, 7 with PWM and 12 that can read analog, and I2C sits on D2/D3 rather than A4/A5 (Arduino Leonardo pinout).
The Leonardo keeps the Uno's footprint and headers but drops the second USB chip. Its ATmega32U4 contains a full-speed USB 2.0 device controller (ATmega32U4 datasheet, p. 1), so the sketch itself runs the USB connection. That is what lets the Keyboard and Mouse libraries make it appear to a computer as a HID keyboard or mouse alongside its virtual COM port.
Because there is one chip, the USB port goes away whenever the board resets. Pressing RESET or uploading drops the COM port, starts the Caterina bootloader for about 8 seconds, then re-enumerates it with the sketch running. Opening the Serial Monitor does not reset the board as it does on an Uno, so anything printed in setup() before you open the monitor is lost unless you wait for Serial (Arduino Leonardo and Micro guide).
Several pins sit where an Uno user does not expect them. I2C is on D2 (SDA) and D3 (SCL), repeated on the SDA/SCL pins by AREF, and A4/A5 are plain analog inputs. Hardware SPI is only on the 6-pin ICSP header, not on D11 to D13. In exchange, six digital pins (D4, D6, D8, D9, D10, D12) double as analog inputs A6 to A11 (Arduino Leonardo pinout).
Arduino Leonardo pinout
| Pin | Function | Type |
|---|---|---|
| NC | NC | passive |
| IOREF | IOREF5 V | power out |
| RESET | Reset (active low)5 V | input |
| 3V3 | 3.3V3.3 V | power out |
| 5V | 5V5 V | power out |
| GND | GND | power in |
| GND-2 | GND | power in |
| VIN | VIN7 V to 12 V recommended | power in |
| A0 | ADC7, Digital5 V | bidirectional |
| A1 | ADC6, Digital5 V | bidirectional |
| A2 | ADC5, Digital5 V | bidirectional |
| A3 | ADC4, Digital5 V | bidirectional |
| A4 | ADC1, Digital5 V | bidirectional |
| A5 | ADC0, Digital5 V | bidirectional |
| D0 | UART RX (Serial1), INT2, Digital5 V | bidirectional |
| D1 | UART TX (Serial1), INT3, Digital5 V | bidirectional |
| D2 | I2C SDA, INT1, Digital5 V | bidirectional |
| D3 | I2C SCL, PWM, INT0, Digital5 V | bidirectional |
| D4 | ADC8 (A6), Digital5 V | bidirectional |
| D5 | PWM, Digital5 V | bidirectional |
| D6 | PWM, ADC10 (A7), Digital5 V | bidirectional |
| D7 | INT6, Digital5 V | bidirectional |
| D8 | ADC11 (A8), Digital5 V | bidirectional |
| D9 | PWM, ADC12 (A9), Digital5 V | bidirectional |
| D10 | PWM, ADC13 (A10), Digital5 V | bidirectional |
| D11 | PWM, Digital5 V | bidirectional |
| D12 | ADC9 (A11), Digital5 V | bidirectional |
| D13 | PWM, Digital, LED_BUILTIN5 V | bidirectional |
| GND-3 | GND | power in |
| AREF | ADC reference0 V to 5 V | power in |
| SDA | I2C SDA5 V | bidirectional |
| SCL | I2C SCL5 V | bidirectional |
| ICSP-1 | SPI MISO5 V | bidirectional |
| ICSP-2 | ICSP 2 (+5V)5 V | power out |
| ICSP-3 | SPI SCK5 V | bidirectional |
| ICSP-4 | SPI MOSI5 V | bidirectional |
| ICSP-5 | Reset5 V | input |
| ICSP-6 | ICSP 6 (GND) | power in |
Arduino Leonardo code
Every example here compiles for its board.
// Arduino Leonardo on Arduino Leonardo: wiring and a free simulation at https://www.tinkered.ai/components/arduino-leonardo
// Arduino Leonardo: a one-button USB keyboard.
// Wire a pushbutton between D4 and GND. Each press types a line on the computer.
// The board only types when the button is pressed, so it never floods the PC with keys.
#include <Keyboard.h>

const int BUTTON_PIN = 4;          // pushbutton to GND, internal pull-up
const int LED_PIN = LED_BUILTIN;   // D13, the yellow L LED

bool wasPressed = false;
unsigned long lastChangeMs = 0;
unsigned long presses = 0;

void setup() {
  pinMode(BUTTON_PIN, INPUT_PULLUP);
  pinMode(LED_PIN, OUTPUT);
  Serial.begin(115200);            // USB serial (CDC); no while(!Serial) so it runs without a terminal
  Keyboard.begin();
}

void loop() {
  bool pressed = digitalRead(BUTTON_PIN) == LOW;
  if (pressed != wasPressed && millis() - lastChangeMs > 30) {   // 30 ms debounce
    lastChangeMs = millis();
    wasPressed = pressed;
    if (pressed) {
      presses++;
      digitalWrite(LED_PIN, HIGH);
      Keyboard.print("Hello from an Arduino Leonardo, press ");
      Keyboard.print(presses);
      Keyboard.write(KEY_RETURN);
      Serial.print("Typed line ");
      Serial.println(presses);
      digitalWrite(LED_PIN, LOW);
    }
  }
}
Before you wire it
- Use Serial1 for a module wired to D0/D1; Serial is the USB port to the computer (Arduino Leonardo and Micro guide).
- Put a hardware enable (a button or switch) in front of every Keyboard or Mouse call, so a runaway sketch cannot stop you from reprogramming the board.
- Wire I2C modules to D2 (SDA) and D3 (SCL), or to the SDA/SCL pins by AREF (Arduino Leonardo pinout).
- Take SPI from the ICSP header (MISO, SCK, MOSI); D11 to D13 are not the SPI pins on this board.
- Keep each pin within 40 mA absolute maximum and the whole chip within 200 mA through VCC/GND (ATmega32U4 datasheet, p. 383); drive motors and LED strips through a transistor or driver.
- Never take more than 50 mA from the 3.3V pin (Arduino Leonardo pinout).
- Never feed a 3.3 V-only module's inputs straight from the Leonardo's 5 V outputs; use a level shifter or a divider.
- Never disable interrupts or block USB for long: the IDE's auto-reset relies on the board seeing a 1200 baud open and close on its USB port.
- The Leonardo resets into its bootloader when the IDE opens the port at 1200 baud and closes it. The bootloader runs for about 8 seconds, pulsing the L LED, then starts the sketch (Caterina.c, TIMEOUT_PERIOD 8000).
- After power-up the bootloader is skipped and the sketch starts at once; after a press of RESET it runs first (Caterina.c).
- The RX LED is driven from PB0, the chip's SPI SS pin; the TX LED is on PD5 (Arduino Leonardo pinout).
- AREF sets the top of the ADC range; with nothing on it, analogRead() reads 0 to 5 V in 1024 steps.
- D2/D3 carry both I2C and external interrupts INT1/INT0, so an I2C bus and a rotary encoder can't share them.
Specifications
- Microcontroller
- ATmega32U4, 8-bit AVR at 16 MHzArduino Leonardo tech specs (A000057), docs.arduino.cc
- Memory
- 32 KB flash (28,672 bytes for sketches after the 4 KB bootloader), 2.5 KB SRAM, 1 KB EEPROMArduino Leonardo tech specs (A000057), docs.arduino.cc; ArduinoCore-avr boards.txt, leonardo entry
- USB
- Native full-speed USB 2.0 device in the chip, micro USB connector; no separate USB-serial chipMicrochip ATmega16U4/32U4 datasheet (Atmel-7766J, 04/2016), p. 1; Arduino Leonardo tech specs (A000057), docs.arduino.cc
- I/O voltage
- 5 V logic; IOREF reads 5 VArduino Leonardo tech specs (A000057), docs.arduino.cc
- Current per I/O pin
- 40 mA absolute maximum per pin and 200 mA through VCC and GND pins; Arduino rates 10 mA DC per pinMicrochip ATmega16U4/32U4 datasheet (Atmel-7766J, 04/2016), p. 383; Arduino Leonardo tech specs (A000057), docs.arduino.cc
- Pins
- 20 digital I/O, 7 with PWM (3, 5, 6, 9, 10, 11, 13), 12 analog inputsArduino Leonardo tech specs (A000057), docs.arduino.cc; Arduino Leonardo full pinout (A000057, updated 30/06/2021)
- ADC
- 10-bit, 12 channels on the board (A0 to A11)Microchip ATmega16U4/32U4 datasheet (Atmel-7766J, 04/2016), p. 2; Arduino Leonardo full pinout (A000057, updated 30/06/2021)
- Power inputs
- USB, barrel jack or VIN, 7 V to 12 V recommendedArduino Leonardo tech specs (A000057), docs.arduino.cc
- 3.3V pin
- 50 mA maximumArduino Leonardo full pinout (A000057, updated 30/06/2021)
- Size
- 68.6 x 53.3 mm, 20 gArduino Leonardo tech specs (A000057), docs.arduino.cc
From the Arduino Leonardo documentation (A000057), published by Arduino (Microchip ATmega32U4).
Common mistakes
Reading a module on Serial instead of Serial1
On the Leonardo, Serial is the virtual COM port over USB and is not connected to D0/D1. A GPS or Bluetooth module wired to RX/TX must be read with Serial1 (Arduino Leonardo and Micro guide).
Missing the first lines in the Serial Monitor
Opening the monitor does not reset a Leonardo, so prints from setup() are already gone. Add while (!Serial) {} after Serial.begin() when you need them, and remove it for a board that runs without a computer, or it will wait forever.
A keyboard sketch that types nonstop
A sketch that calls Keyboard.print() in loop() fills the computer with keystrokes and makes reprogramming hard. Recover by holding RESET, clicking Upload, and releasing RESET when the IDE shows Uploading, then upload a sketch guarded by a button (Arduino Leonardo and Micro guide).
Wiring an Uno shield's I2C or SPI the Uno way
Uno shields that use A4/A5 for I2C or D11 to D13 for SPI do not work as wired: the Leonardo's I2C is D2/D3 and its SPI is only on the ICSP header (Arduino Leonardo pinout). Shields that use the SDA/SCL pins and the ICSP header work.
Upload fails with 'port not found'
The COM port number changes when the board drops into its bootloader. If auto-reset fails, press RESET once just as the IDE starts uploading: the bootloader then waits about 8 seconds for the new port (Caterina.c).
Arduino Leonardo questions
What is the difference between the Arduino Leonardo and the Uno?
The Uno has an ATmega328P plus a separate USB-serial chip; the Leonardo has one ATmega32U4 that runs your sketch and the USB port (Arduino Leonardo and Micro guide). That lets the Leonardo act as a keyboard or mouse, has 2.5 KB of SRAM instead of 2 KB, and gives 12 analog inputs instead of 6. I2C moves to D2/D3 and SPI to the ICSP header (Arduino Leonardo pinout).
Why is Serial not working on pins 0 and 1 of the Leonardo?
On the Leonardo, Serial is the USB virtual COM port. The hardware UART on D0 (RX) and D1 (TX) is Serial1 (Arduino Leonardo and Micro guide). Use Serial for the computer and Serial1 for modules.
How do I put a Leonardo into bootloader mode?
Press RESET once: the Caterina bootloader starts and waits about 8 seconds for an upload while the L LED pulses (Caterina.c). For a board running a sketch that blocks USB, hold RESET, click Upload, and let go when the IDE shows Uploading (Arduino Leonardo and Micro guide).
Which pins are I2C and SPI on the Arduino Leonardo?
I2C is D2 (SDA) and D3 (SCL), also on the SDA and SCL pins by AREF. SPI is only on the ICSP header: MISO on pin 1, SCK on pin 3 and MOSI on pin 4 (Arduino Leonardo pinout).
Can the Leonardo be used as a USB keyboard or game controller?
Yes. The ATmega32U4 has a USB device controller (ATmega32U4 datasheet, p. 1), and the Keyboard and Mouse libraries make the board appear as a HID keyboard or mouse with no driver. Gate every key press behind a button so the board stays programmable.
Does the Arduino Leonardo need a driver?
Usually not: Windows, macOS and Linux load their own USB CDC driver. Some Windows versions show an Unknown USB device, and the board's driver then has to be installed by hand (Arduino Leonardo and Micro guide).
Build something with the Arduino Leonardo
- Build this
Macro keypad
A few buttons that each type a shortcut or a line of text on the computer.
- Build this
Joystick mouse
An analog joystick that moves the cursor, with its button as a left click.
- Build this
USB game controller box
Arcade buttons read by the Leonardo and sent as key presses to a game.
This page as plain Markdown, for ChatGPT, Claude or your own agent. /components/arduino-leonardo.md