PAM8403
A 3 W + 3 W filterless class-D stereo amplifier board that drives two 4 to 8 ohm speakers from a 5 V supply.
- Supply voltage2.5 V to 5.5 V (DFR0119 board: 3.6 V to 5.5 V)
- Absolute maximum supply6.0 V
- Output power at 5 V, 4 ohm3.2 W per channel at 10 % THD+N, 2.5 W at 1 %
- Output power at 5 V, 8 ohm1.8 W per channel at 10 % THD+N, 1.4 W at 1 %
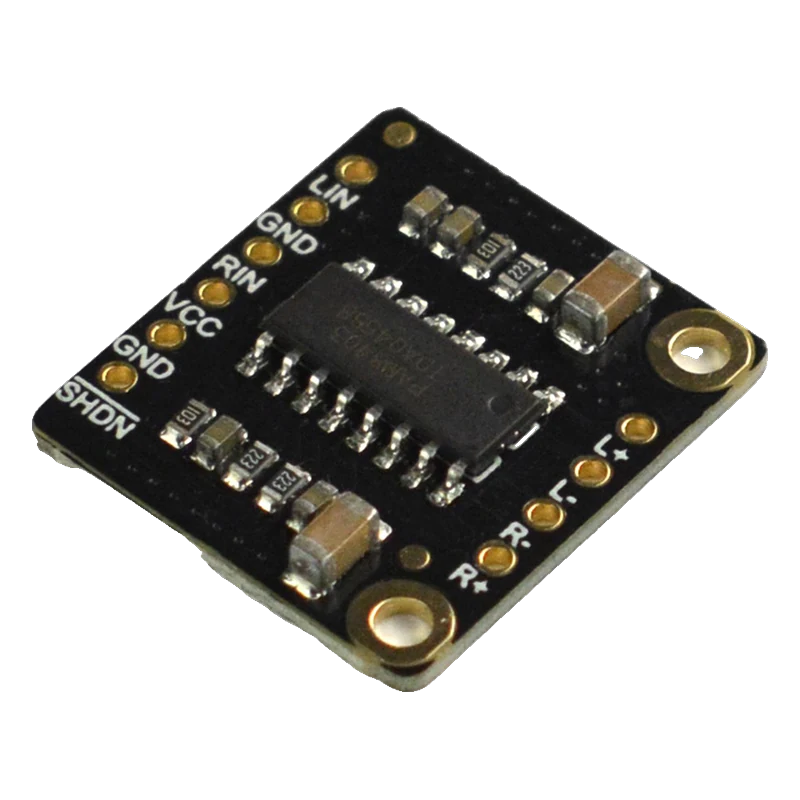
The PAM8403 is a filterless class-D stereo amplifier: at 5 V it delivers 3.2 W per channel into 4 ohm or 1.8 W into 8 ohm at 10 % THD, with a fixed 24 dB gain (Diodes PAM8403 datasheet DS36439, p. 4). It runs from 2.5 V to 5.5 V and is destroyed above 6 V (pp. 3, 4). Feed line-level audio into LIN and RIN, and wire each speaker between its own + and - outputs, never to ground.
Class-D amplifiers switch their outputs at high frequency and let the speaker coil average the result, which is why the PAM8403 reaches up to 90 % efficiency (Diodes datasheet, p. 1) and stays cool on a small board. Its outputs are bridge-tied: each speaker connects between L+ and L- (or R+ and R-), and both terminals carry the switching signal.
The chip's gain is fixed at 24 dB (datasheet, p. 4), so a line-level signal of a few hundred millivolts already drives it to full power. A GPIO's 3.3 V or 5 V square wave is far too large; attenuate it with a resistor divider and couple it through a capacitor, as the datasheet's input capacitor guidance describes (p. 8).
DFRobot's Fermion breakout (DFR0119) brings out LIN, RIN, two grounds, VCC and an active-low SHDN on one header and L+, L-, R-, R+ on the other. It wants 3.6 V to 5.5 V, and SHDN can be left open for normal operation (DFRobot DFR0119 wiki). Generic green PAM8403 boards with a volume knob use the same chip and the same rules.
PAM8403 pinout
| Pin | Function | Type |
|---|---|---|
| LIN | Audio in, leftLine level, a few hundred mV | input |
| GND1 | GND | power in |
| RIN | Audio in, right | input |
| VCC | VCC3.6 V to 5.5 V | power in |
| GND2 | GND | power in |
| SHDN | Shutdown (active low) | input |
| LP | Speaker | output |
| LM | Speaker | output |
| RM | Speaker | output |
| RP | Speaker | output |
How to wire the PAM8403
Pin by pin, for the board you have.
| PAM8403 | Arduino Uno | Note |
|---|---|---|
| VCC | 5V | |
| GND2 | GND | |
| LIN | D8 | Through a divider and capacitor: D8, 10 kOhm, a node with 1 kOhm to GND, then 1 µF into LIN. |
| GND1 | GND | |
| SHDN | D7 | HIGH runs the amplifier, LOW mutes it to under 1 µA. |
| LP | Speaker + | |
| LM | Speaker - |
- Never connect L- or R- to GND: both outputs switch, and grounding one shorts the amplifier.
- Use a 4 ohm or 8 ohm speaker. At full power on 4 ohm the board draws well over 1 A from 5 V, more than the Uno's USB supply; keep the volume moderate or use a separate 5 V supply with shared ground.
| PAM8403 | ESP32 DevKit V1 | Note |
|---|---|---|
| VCC | VIN | 5 V from USB. |
| GND2 | GND | |
| LIN | GPIO25 (D25) | Through 10 kOhm, a node with 1 kOhm to GND, then 1 µF into LIN. |
| GND1 | GND | |
| SHDN | GPIO26 (D26) | 3.3 V HIGH runs it, LOW mutes it. |
| LP | Speaker + | |
| LM | Speaker - |
- Power VCC from 5 V (VIN), not from 3V3: the speaker current would overload the ESP32's regulator.
- Never ground L- or R-.
| PAM8403 | Raspberry Pi Pico | Note |
|---|---|---|
| VCC | VBUS | 5 V from USB. |
| GND2 | GND | |
| LIN | GP15 | Through 10 kOhm, a node with 1 kOhm to GND, then 1 µF into LIN. |
| GND1 | GND | |
| SHDN | GP14 | HIGH runs it, LOW mutes it. |
| LP | Speaker + | |
| LM | Speaker - |
- Feed VCC from VBUS or a separate 5 V supply, never from 3V3(OUT), whose load should stay under 300 mA (Raspberry Pi Pico datasheet, p. 9).
- Never ground L- or R-.
PAM8403 code
Every example here compiles for its board.
// PAM8403 on Arduino Uno: wiring and a free simulation at https://www.tinkered.ai/components/pam8403
// PAM8403 on an Arduino Uno: tone on D8 (through 10k/1k divider and 1 uF) into LIN, SHDN on D7.
const int AUDIO_PIN = 8;
const int SHDN_PIN = 7;
const int NOTES[] = {262, 294, 330, 349, 392, 440, 494, 523}; // C4 to C5 in Hz

void setup() {
  Serial.begin(115200);
  pinMode(SHDN_PIN, OUTPUT);
  digitalWrite(SHDN_PIN, LOW);  // keep it asleep while the supply settles
  delay(10);
  digitalWrite(SHDN_PIN, HIGH); // then enable the amplifier
  Serial.println("PAM8403 ready");
}

void loop() {
  for (int i = 0; i < 8; i++) {
    Serial.print("Note ");
    Serial.print(NOTES[i]);
    Serial.println(" Hz");
    tone(AUDIO_PIN, NOTES[i], 300);
    delay(350);
  }
  digitalWrite(SHDN_PIN, LOW); // mute between scales
  Serial.println("Muted");
  delay(1500);
  digitalWrite(SHDN_PIN, HIGH);
}
// PAM8403 on ESP32 DevKit V1: wiring and a free simulation at https://www.tinkered.ai/components/pam8403
// PAM8403 on an ESP32 DevKit V1: tone on GPIO25 (through 10k/1k divider and 1 uF) into LIN, SHDN on GPIO26.
const int AUDIO_PIN = 25;
const int SHDN_PIN = 26;
const int NOTES[] = {262, 294, 330, 349, 392, 440, 494, 523};

void setup() {
  Serial.begin(115200);
  pinMode(SHDN_PIN, OUTPUT);
  digitalWrite(SHDN_PIN, LOW);
  delay(10);
  digitalWrite(SHDN_PIN, HIGH);
  Serial.println("PAM8403 ready");
}

void loop() {
  for (int i = 0; i < 8; i++) {
    Serial.printf("Note %d Hz\n", NOTES[i]);
    tone(AUDIO_PIN, NOTES[i], 300);
    delay(350);
  }
  digitalWrite(SHDN_PIN, LOW);
  Serial.println("Muted");
  delay(1500);
  digitalWrite(SHDN_PIN, HIGH);
}
// PAM8403 on Raspberry Pi Pico: wiring and a free simulation at https://www.tinkered.ai/components/pam8403
// PAM8403 on a Raspberry Pi Pico (arduino-pico): tone on GP15 (through 10k/1k divider and 1 uF) into LIN, SHDN on GP14.
const int AUDIO_PIN = 15;
const int SHDN_PIN = 14;
const int NOTES[] = {262, 294, 330, 349, 392, 440, 494, 523};

void setup() {
  Serial.begin(115200);
  pinMode(SHDN_PIN, OUTPUT);
  digitalWrite(SHDN_PIN, LOW);
  delay(10);
  digitalWrite(SHDN_PIN, HIGH);
  Serial.println("PAM8403 ready");
}

void loop() {
  for (int i = 0; i < 8; i++) {
    Serial.print("Note ");
    Serial.print(NOTES[i]);
    Serial.println(" Hz");
    tone(AUDIO_PIN, NOTES[i], 300);
    delay(350);
  }
  digitalWrite(SHDN_PIN, LOW);
  Serial.println("Muted");
  delay(1500);
  digitalWrite(SHDN_PIN, HIGH);
}
Before you wire it
- Keep the supply between 2.5 V and 5.5 V (Diodes datasheet, p. 4); four fresh alkaline cells exceed 6 V and can kill it, so use three cells or four NiMH (p. 7).
- Wire each speaker between its own + and - outputs, with nothing else on them.
- Attenuate a GPIO signal before LIN or RIN: the 24 dB gain (datasheet, p. 4) clips a full logic-level square wave.
- Couple sources through a capacitor; the input must stay within -0.3 V to VDD + 0.3 V (datasheet, p. 3).
- Decouple the supply near the board with about 1 µF ceramic plus 20 µF or more, as the datasheet recommends (p. 8).
- Never ground L- or R-, or join the two channels' outputs: the outputs are bridge-tied.
- Never feed the outputs into another amplifier's input; they are a switching signal for a speaker coil.
- Never power it from a 3.3 V regulator pin at full volume: 3 W into a speaker means well over half an amp.
- Never exceed 6 V on VCC, even briefly (datasheet, p. 3).
- Gain is 20 log(2 x RF/RI) and the chip limits it to 24 dB (datasheet, p. 7); the board has no gain setting, so control volume at the source or with a potentiometer before LIN and RIN.
- The input capacitor and the chip's input resistance form a high-pass filter; small speakers reproduce little below 100 to 150 Hz anyway, so 0.47 µF to 1 µF is plenty (datasheet, p. 8).
- The 10 kOhm and 1 kOhm divider in the wiring turns a 5 V square wave into about 0.45 Vpp, a usable line level.
- Short-circuit protection disables the outputs if they are shorted to each other or to ground, and thermal shutdown protects the chip (datasheet, pp. 1, 8).
- Hold SHDN low for about 10 ms after power-up before enabling, to reduce the turn-on pop.
Specifications
- Supply voltage
- 2.5 V to 5.5 V (DFR0119 board: 3.6 V to 5.5 V)Diodes PAM8403 datasheet DS36439, p. 4; DFRobot DFR0119 wiki
- Absolute maximum supply
- 6.0 VDiodes PAM8403 datasheet DS36439, p. 3
- Output power at 5 V, 4 ohm
- 3.2 W per channel at 10 % THD+N, 2.5 W at 1 %Diodes PAM8403 datasheet DS36439, p. 4
- Output power at 5 V, 8 ohm
- 1.8 W per channel at 10 % THD+N, 1.4 W at 1 %Diodes PAM8403 datasheet DS36439, p. 4
- Gain
- 24 dB fixedDiodes PAM8403 datasheet DS36439, pp. 4, 7
- Efficiency
- Up to 90 %Diodes PAM8403 datasheet DS36439, p. 1
- Quiescent current
- 10 mA at 3.6 V, no load; under 1 µA in shutdownDiodes PAM8403 datasheet DS36439, p. 4
- Input voltage range
- -0.3 V to VDD + 0.3 VDiodes PAM8403 datasheet DS36439, p. 3
- SHDN on the breakout
- Low puts the amplifier to sleep; open or high runs itDFRobot DFR0119 wiki
From the PAM8403 Filterless 3W Class-D Stereo Audio Amplifier, DS36439 Rev. 2-3, published by Diodes Incorporated.
Common mistakes
Speaker minus to ground
With most amplifiers the speaker's negative goes to ground; with the PAM8403 both outputs switch (bridge-tied). Grounding L- shorts an output and the short-circuit protection shuts the channel down (Diodes datasheet, p. 8).
Four AA batteries
Four fresh alkaline cells measure over 6 V, above the 6.0 V absolute maximum (datasheet, pp. 3, 7). Use three alkaline cells, four NiMH cells or a regulated 5 V supply.
Distorted, very loud beeps
A 5 V square wave straight into LIN, multiplied by the 24 dB gain, clips hard. Add the 10 kOhm and 1 kOhm divider and a coupling capacitor, or turn down the source.
Noise and hum
Long input wires pick up the class-D switching and USB noise. Keep audio wires short, share a single ground point and add the supply capacitors the datasheet recommends (p. 8).
PAM8403 questions
How much power does the PAM8403 really give?
At 5 V into 4 ohm, 3.2 W per channel at 10 % distortion or 2.5 W at 1 %; into 8 ohm, 1.8 W and 1.4 W (Diodes datasheet, p. 4). At 3.6 V the figures drop by about half.
PAM8403 vs LM386: which amplifier should I use?
The PAM8403 is a stereo class-D amplifier, up to 90 % efficient (datasheet, p. 1), giving watts from 5 V. The LM386 is a mono class-AB amplifier giving well under a watt and wasting more power as heat. For battery and USB projects the PAM8403 is the better choice.
Can I connect the PAM8403 to an Arduino?
Yes, for beeps and simple tones: use tone() on a pin, a 10 kOhm and 1 kOhm divider and a 1 µF capacitor into LIN. For music, feed it from a DAC or an MP3 module such as the DFPlayer Mini.
What does the SHDN pin do?
Pulling it low shuts the amplifier down to under 1 µA (datasheet, p. 4). On the DFRobot board it runs when the pin is left open (DFR0119 wiki), so you only need to wire it to mute from code.
Can I use one speaker with both channels?
Not by joining the outputs. Use one channel for one speaker, or mix left and right through two resistors into a single input if you want both signals in one speaker.
Build something with the PAM8403
- Build this
Desktop speaker pair
Amplify a phone or PC line output into two small speakers.
- Build this
Doorbell chime
Play a melody through a speaker when a button is pressed.
- Build this
Audio alarm for a sensor
Sound a loud alert from a gas or water sensor.
This page as plain Markdown, for ChatGPT, Claude or your own agent. /components/pam8403.md