MAX4466
An electret microphone breakout with a MAX4466 op-amp and a gain trimmer (25x to 125x), giving an analog audio signal centred on half the supply.
- Supply voltage2.4 V to 5.5 V (breakout: 2.4 V to 5 V)
- Absolute maximum supply6 V
- Amplifier supply current24 µA typical, 48 µA maximum at 25 °C
- Gain-bandwidth600 kHz, stable at gains of 5 V/V and above
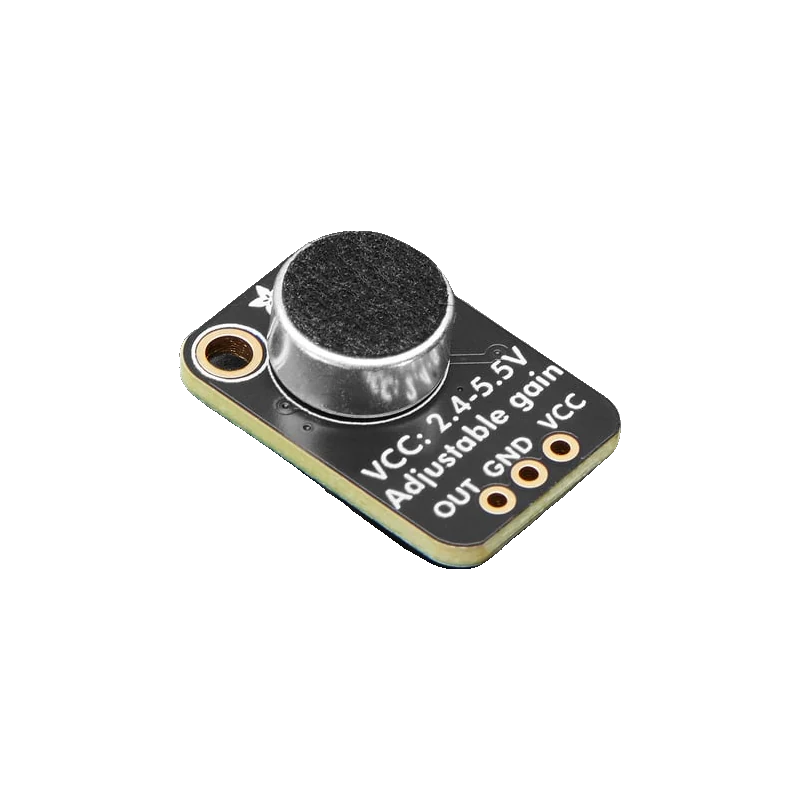
The MAX4466 breakout pairs an electret microphone with a low-noise op-amp whose gain you set with a trimmer from 25x to 125x; its output rides on a DC bias of VCC/2 and swings rail to rail (Adafruit #1063 product page). It runs from 2.4 V to 5.5 V on just 24 µA for the amplifier (Maxim MAX4465-MAX4469 datasheet 19-1950 Rev 1, pp. 1, 2). Power it from the same 3.3 V as your ADC on an ESP32 or Pico, since a 5 V supply lets the output reach 5 V.
The MAX4466 is a micropower op-amp tuned for microphone preamplifiers: 600 kHz of gain-bandwidth, stable at gains of 5 and above, with rail-to-rail outputs (Maxim datasheet, p. 1). On Adafruit's breakout it amplifies an electret capsule rated 20 Hz to 20 kHz, and a small trimmer on the back sets the gain between 25x and 125x (Adafruit #1063).
Unlike the MAX9814, there is no automatic gain control. The output grows in proportion to the sound, which makes this the module to use for sound-level meters, clap and knock detection, or a VU display that should show quiet and loud as different.
The output is DC coupled and centred on VCC/2: 1.65 V on a 3.3 V supply, 2.5 V on 5 V. Because it swings rail to rail, loud sounds can drive it all the way to the supply, so the supply you choose sets the highest voltage your ADC pin will see.
MAX4466 pinout
| Pin | Function | Type |
|---|---|---|
| OUT | ADC, Analog audio0 V to VCC, centred on VCC/2 | output |
| GND | GND | power in |
| VCC | VCC2.4 V to 5 V | power in |
How to wire the MAX4466
Pin by pin, for the board you have.
| MAX4466 | Arduino Uno | Note |
|---|---|---|
| VCC | 3.3V | The Uno's 3.3 V rail is the quieter supply; the module draws well under 1 mA of its 50 mA. |
| GND | GND | |
| OUT | A0 |
| MAX4466 | ESP32 DevKit V1 | Note |
|---|---|---|
| VCC | 3V3 | |
| GND | GND | |
| OUT | GPIO34 (D34) | ADC1 input, usable with Wi-Fi on. |
- Never power the module from VIN or 5 V on an ESP32: its rail-to-rail output would then swing up to 5 V into a 3.3 V pin.
| MAX4466 | Raspberry Pi Pico | Note |
|---|---|---|
| VCC | 3V3(OUT) | |
| GND | GND | AGND (pin 33) gives the quietest reading. |
| OUT | GP26 | ADC0. |
- Never power the module from VBUS or VSYS: the output would swing above the Pico's 3.3 V ADC limit.
MAX4466 code
Every example here compiles for its board.
// MAX4466 on Arduino Uno: wiring and a free simulation at https://www.tinkered.ai/components/max4466
// MAX4466 on an Arduino Uno: VCC 3.3V, OUT A0. Prints the peak-to-peak level of each 50 ms window.
const int MIC_PIN = A0;
const unsigned long WINDOW_MS = 50;

void setup() {
  Serial.begin(115200);
  Serial.println("MAX4466 level meter");
}

void loop() {
  int lo = 1023, hi = 0;
  unsigned long start = millis();
  while (millis() - start < WINDOW_MS) {
    int v = analogRead(MIC_PIN); // 10-bit, 0 to 5 V reference
    if (v < lo) lo = v;
    if (v > hi) hi = v;
  }
  float vpp = (hi - lo) * 5.0 / 1023.0;
  Serial.print("Peak-to-peak: ");
  Serial.print(vpp, 3);
  Serial.println(" V");
}
// MAX4466 on ESP32 DevKit V1: wiring and a free simulation at https://www.tinkered.ai/components/max4466
// MAX4466 on an ESP32 DevKit V1: VCC 3V3, OUT GPIO34. Prints the peak-to-peak level of each 50 ms window.
const int MIC_PIN = 34;
const unsigned long WINDOW_MS = 50;

void setup() {
  Serial.begin(115200);
  Serial.println("MAX4466 level meter");
}

void loop() {
  uint32_t lo = 5000, hi = 0;
  unsigned long start = millis();
  while (millis() - start < WINDOW_MS) {
    uint32_t mv = analogReadMilliVolts(MIC_PIN);
    if (mv < lo) lo = mv;
    if (mv > hi) hi = mv;
  }
  Serial.printf("Peak-to-peak: %u mV  (centre %u mV)\n", hi - lo, (hi + lo) / 2);
}
// MAX4466 on Raspberry Pi Pico: wiring and a free simulation at https://www.tinkered.ai/components/max4466
// MAX4466 on a Raspberry Pi Pico (arduino-pico): VCC 3V3(OUT), OUT GP26 (ADC0).
// Prints the peak-to-peak level of each 50 ms window.
const int MIC_PIN = 26;
const unsigned long WINDOW_MS = 50;

void setup() {
  Serial.begin(115200);
  analogReadResolution(12); // 0..4095 over 0..3.3 V
  Serial.println("MAX4466 level meter");
}

void loop() {
  int lo = 4095, hi = 0;
  unsigned long start = millis();
  while (millis() - start < WINDOW_MS) {
    int v = analogRead(MIC_PIN);
    if (v < lo) lo = v;
    if (v > hi) hi = v;
  }
  float vpp = (hi - lo) * 3.3 / 4095.0;
  Serial.print("Peak-to-peak: ");
  Serial.print(vpp, 3);
  Serial.println(" V");
}
Before you wire it
- On a 3.3 V board, power VCC from 3.3 V: the output swings rail to rail (Adafruit #1063), so its supply is the highest voltage the ADC pin sees.
- Measure peak-to-peak over a window (20 to 50 ms) to get loudness; a single sample only lands somewhere on the waveform.
- Start with the trimmer near the middle and turn it up until normal sounds use most of the ADC range without flat-topping.
- Use the quietest supply available, such as the Uno's 3.3V pin, as Adafruit recommends (#1063).
- Never power it above 5.5 V; the absolute maximum is 6 V (Maxim datasheet, p. 2).
- Never wire OUT to a 3.3 V board's ADC while VCC is on 5 V.
- Never drive a speaker from OUT; it is a preamplifier output for an ADC or amplifier input.
- With no sound, OUT rests at VCC/2: about 1.65 V on 3.3 V, which reads about 338 on an Uno's 5 V scale, 2048 on a 12-bit Pico reading.
- The op-amp needs a gain of at least 5 to be stable (Maxim datasheet, p. 1); the breakout's 25x minimum keeps well inside that.
- The electret capsule gets its bias from the board; nothing else is needed between the module and an ADC pin.
- For a line input, add a 1 µF to 10 µF series capacitor to block the VCC/2 offset.
Specifications
- Supply voltage
- 2.4 V to 5.5 V (breakout: 2.4 V to 5 V)Maxim MAX4465-MAX4469 datasheet 19-1950 Rev 1, p. 2; Adafruit #1063 product page
- Absolute maximum supply
- 6 VMaxim MAX4465-MAX4469 datasheet 19-1950 Rev 1, p. 2
- Amplifier supply current
- 24 µA typical, 48 µA maximum at 25 °CMaxim MAX4465-MAX4469 datasheet 19-1950 Rev 1, p. 2
- Gain-bandwidth
- 600 kHz, stable at gains of 5 V/V and aboveMaxim MAX4465-MAX4469 datasheet 19-1950 Rev 1, p. 1
- Gain on the breakout
- Adjustable 25x to 125x with the trimmerAdafruit Electret Microphone Amplifier MAX4466 (#1063) product page
- Output
- DC bias of VCC/2, rail to rail (up to 5 Vpp on a 5 V supply)Adafruit Electret Microphone Amplifier MAX4466 (#1063) product page
- Microphone
- Electret capsule rated 20 Hz to 20 kHzAdafruit Electret Microphone Amplifier MAX4466 (#1063) product page
From the MAX4465 to MAX4469 SC70/SOT23 Micropower Microphone Preamplifiers, 19-1950 Rev 1, published by Analog Devices (Maxim Integrated).
Common mistakes
Powering it from 5 V on an ESP32
The output is rail to rail, so loud sounds push it to the supply. With VCC on 5 V the ESP32's ADC pin sees up to 5 V; use 3V3 instead.
Clipping at full gain
At 125x a nearby voice can already hit both rails, and every loud sound then reads the same. Turn the trimmer down until the loudest expected sound stays under the full range.
Expecting automatic levelling
The MAX4466 has fixed gain. Quiet sounds stay small and loud ones clip. If you want a steady output across loudness, the MAX9814 with AGC is the better fit.
Reading noise from the supply
A USB 5 V rail carries switching noise the microphone amplifier passes straight through. Power from the 3.3 V regulator output and keep the module away from motors and Wi-Fi antennas.
MAX4466 questions
MAX4466 vs MAX9814: which is better?
Neither is better overall. The MAX4466 has fixed, trimmer-set gain (25x to 125x), so it shows real changes in loudness. The MAX9814 has automatic gain control that keeps its output near 2 Vpp, which is better for recording or audio effects across quiet and loud rooms.
Does the MAX4466 work at 3.3 V?
Yes. The amplifier runs from 2.4 V to 5.5 V (Maxim datasheet, p. 2), and at 3.3 V the output centres on 1.65 V and stays inside a 3.3 V ADC range. That is the right way to use it with an ESP32 or Raspberry Pi Pico.
How do I adjust the MAX4466 gain?
Turn the small trimmer on the back with a screwdriver: one end is 25x, the other 125x (Adafruit #1063). Watch the peak-to-peak readings while you speak at your usual distance and stop before the signal clips.
Can I measure decibels with the MAX4466?
You can measure relative loudness, and with a reference sound level meter you can calibrate it to dB SPL at one gain setting. Without calibration the numbers only compare louder and quieter, since the capsule's sensitivity and the trimmer position vary.
Build something with the MAX4466
- Build this
Noise level monitor
Show classroom or office loudness as a coloured bar.
- Build this
Knock lock
Open a lock only after a secret knock pattern.
- Build this
VU meter
Draw a moving audio level meter on an OLED.
This page as plain Markdown, for ChatGPT, Claude or your own agent. /components/max4466.md