KY-038 Sound Sensor
A microphone module with a raw analog output and a digital output that trips on loud sounds such as claps.
- PinsAO (analog), G (GND), + (VCC), DO (digital)
- Supply5 V on Arduino, 3.3 V on Raspberry Pi and micro:bit in the maker's wiring
- AO behaviourRaw microphone signal, inverted: louder gives a lower voltage
- DO behaviourHIGH, with LED2 lit, while the sound exceeds the potentiometer threshold
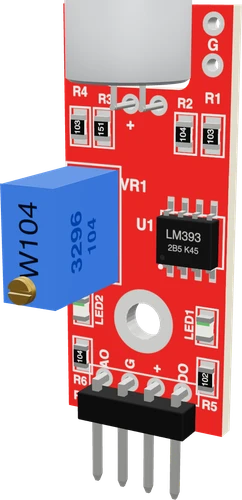
The KY-038 is a microphone module: its analog output (AO) carries the microphone's raw signal, and an LM393 comparator drives a digital output (DO) that goes HIGH when the sound passes a threshold set on the potentiometer (Joy-IT SensorKit, KY-038). Wire + to 5 V on an Arduino or 3.3 V on a 3.3 V board, G to GND, AO to an analog pin and DO to a digital pin; it detects loud sounds and claps, not speech or decibel levels.
The KY-038 is the four-pin microphone module from the Keyes KY sensor kit family, also sold in Joy-IT's SensorKit. An electret microphone capsule sits at the front of the board, with an LM393 comparator, a sensitivity potentiometer, a power LED (LED1) and a sound LED (LED2) (Joy-IT SensorKit, KY-038).
AO gives the direct measured value of the microphone and is inverted: a higher sound pressure pushes the voltage lower. DO comes from the LM393, which compares the signal with the threshold set on the potentiometer; DO goes HIGH and LED2 lights while the sound level is above that threshold (Joy-IT SensorKit, KY-038).
There is no amplifier between the capsule and AO, so the signal is small. A clap or a bang moves AO clearly; normal talking barely does. That makes the KY-038 a good clap switch or noise trigger and a poor choice for recording audio, measuring decibels or recognising speech. For real audio, use an I2S MEMS microphone such as the INMP441.
KY-038 Sound Sensor pinout
| Pin | Function | Type |
|---|---|---|
| AO | ADC the capsule's signal on the trimmer's DC level | output |
| GND | G (GND) | power in |
| VCC | + (3.3-5.5 V)3.3–5 V | power in |
| DO | Digital | output |
How to wire the KY-038 Sound Sensor
Pin by pin, for the board you have.
| KY-038 Sound Sensor | Arduino Uno | Note |
|---|---|---|
| VCC | 5V | |
| GND | GND | |
| AO | A0 | |
| DO | D2 |
| KY-038 Sound Sensor | ESP32 DevKit V1 | Note |
|---|---|---|
| VCC | 3V3 | |
| GND | GND | |
| AO | GPIO33 (D33) | |
| DO | GPIO13 (D13) |
| KY-038 Sound Sensor | Raspberry Pi Pico | Note |
|---|---|---|
| VCC | 3V3 | |
| GND | GND | |
| AO | GP28 | |
| DO | GP0 |
KY-038 Sound Sensor code
Every example here compiles for its board.
// KY-038 Sound Sensor on Arduino Uno: wiring and a free simulation at https://www.tinkered.ai/components/sound-sensor-ky-038
const int AO_PIN = A0;               // KY-038 AO: the capsule's signal on a DC level
const int DO_PIN = 2;                // KY-038 DO: HIGH while the sound passes the trimmer's threshold
const unsigned long WINDOW_MS = 50;  // one loudness reading per 50 ms
const unsigned long CLAP_GAP_MS = 300;

int claps = 0;
unsigned long lastClap = 0;
unsigned long lastPrint = 0;

void setup() {
  Serial.begin(9600);
  pinMode(DO_PIN, INPUT);  // the module has its own pull-up
  Serial.println("KY-038 ready");
}

void loop() {
  // the swing of AO over a window: its peak-to-peak is the loudness
  unsigned long start = millis();
  int lo = 1023, hi = 0;
  bool loud = false;
  while (millis() - start < WINDOW_MS) {
    int v = analogRead(AO_PIN);
    if (v < lo) lo = v;
    if (v > hi) hi = v;
    if (digitalRead(DO_PIN) == HIGH) loud = true;
  }
  int level = hi - lo;

  // one clap per CLAP_GAP_MS, however long DO stays HIGH
  if (loud && millis() - lastClap > CLAP_GAP_MS) {
    lastClap = millis();
    claps++;
    Serial.print("Clap ");
    Serial.print(claps);
    Serial.print("  (level ");
    Serial.print(level);
    Serial.println(")");
  }

  if (millis() - lastPrint >= 1000) {
    lastPrint = millis();
    Serial.print("AO ");
    Serial.print((lo + hi) / 2);
    Serial.print("  level ");
    Serial.println(level);
  }
}
// KY-038 Sound Sensor on ESP32 DevKit V1: wiring and a free simulation at https://www.tinkered.ai/components/sound-sensor-ky-038
const int AO_PIN = 33;               // KY-038 AO: the capsule's signal on a DC level
const int DO_PIN = 13;                // KY-038 DO: HIGH while the sound passes the trimmer's threshold
const unsigned long WINDOW_MS = 50;  // one loudness reading per 50 ms
const unsigned long CLAP_GAP_MS = 300;

int claps = 0;
unsigned long lastClap = 0;
unsigned long lastPrint = 0;

void setup() {
  Serial.begin(9600);
  pinMode(DO_PIN, INPUT);  // the module has its own pull-up
  Serial.println("KY-038 ready");
}

void loop() {
  // the swing of AO over a window: its peak-to-peak is the loudness
  unsigned long start = millis();
  int lo = 4095, hi = 0;   // the ESP32 reads 12 bits: 0 to 4095
  bool loud = false;
  while (millis() - start < WINDOW_MS) {
    int v = analogRead(AO_PIN);
    if (v < lo) lo = v;
    if (v > hi) hi = v;
    if (digitalRead(DO_PIN) == HIGH) loud = true;
  }
  int level = hi - lo;

  // one clap per CLAP_GAP_MS, however long DO stays HIGH
  if (loud && millis() - lastClap > CLAP_GAP_MS) {
    lastClap = millis();
    claps++;
    Serial.print("Clap ");
    Serial.print(claps);
    Serial.print("  (level ");
    Serial.print(level);
    Serial.println(")");
  }

  if (millis() - lastPrint >= 1000) {
    lastPrint = millis();
    Serial.print("AO ");
    Serial.print((lo + hi) / 2);
    Serial.print("  level ");
    Serial.println(level);
  }
}
// KY-038 Sound Sensor on Raspberry Pi Pico: wiring and a free simulation at https://www.tinkered.ai/components/sound-sensor-ky-038
const int AO_PIN = 28;               // KY-038 AO: the capsule's signal on a DC level
const int DO_PIN = 0;                // KY-038 DO: HIGH while the sound passes the trimmer's threshold
const unsigned long WINDOW_MS = 50;  // one loudness reading per 50 ms
const unsigned long CLAP_GAP_MS = 300;

int claps = 0;
unsigned long lastClap = 0;
unsigned long lastPrint = 0;

void setup() {
  Serial.begin(9600);
  pinMode(DO_PIN, INPUT);  // the module has its own pull-up
  Serial.println("KY-038 ready");
}

void loop() {
  // the swing of AO over a window: its peak-to-peak is the loudness
  unsigned long start = millis();
  int lo = 1023, hi = 0;
  bool loud = false;
  while (millis() - start < WINDOW_MS) {
    int v = analogRead(AO_PIN);
    if (v < lo) lo = v;
    if (v > hi) hi = v;
    if (digitalRead(DO_PIN) == HIGH) loud = true;
  }
  int level = hi - lo;

  // one clap per CLAP_GAP_MS, however long DO stays HIGH
  if (loud && millis() - lastClap > CLAP_GAP_MS) {
    lastClap = millis();
    claps++;
    Serial.print("Clap ");
    Serial.print(claps);
    Serial.print("  (level ");
    Serial.print(level);
    Serial.println(")");
  }

  if (millis() - lastPrint >= 1000) {
    lastPrint = millis();
    Serial.print("AO ");
    Serial.print((lo + hi) / 2);
    Serial.print("  level ");
    Serial.println(level);
  }
}
Before you wire it
- + (VCC) to the board's 5 V on an Uno, Nano, Mega or UNO R4; to 3V3 on an ESP32, ESP32-S3, ESP32-C3, ESP8266 or Pico (it runs from 3.3 V, and on 5 V its AO and DO reach 5 V, over a 3.3 V pin's limit). G (GND) to GND.
- AO to an ANALOG input: A0-A5 on an Uno, Nano or UNO R4, A0-A15 on a Mega, GP26-GP28 on a Pico, A0 on an ESP8266 NodeMCU, an ADC1 pin on an ESP32 (GPIO32-39; GPIO0-4 on a C3, GPIO1-10 on an S3).
- DO to a digital input with pinMode(pin, INPUT): the module has its own 10 kΩ pull-up (R1).
- Read AO as a SWING, never one sample: take reads for a window (20-50 ms), keep the highest and the lowest, and use max - min (peak-to-peak) as the loudness. Or compare each read with a baseline averaged in silence at start-up.
- Debounce DO: a clap holds it HIGH for tens of milliseconds (a real one chatters at the sound's frequency), so count one event, then ignore DO for 200-300 ms.
- No single analogRead(AO) compared with a fixed number like 512: AO's rest depends on the trimmer and the supply.
- No analogRead() on DO, no digitalRead() on AO.
- No 5 V on + with a 3.3 V board (ESP32, ESP8266, Pico).
- No pull-up or pull-down on AO, nor an LED on it.
- No ESP32 ADC2 pin (GPIO 0/2/4/12-15/25-27) for AO when the sketch uses Wi-Fi: ADC2 reads nothing while the radio runs. GPIO5 on an ESP32-C3 is ADC2: the Arduino core refuses analogRead there.
- Do not promise speech recognition, decibels or music analysis from AO: the KY-038 has no amplifier.
- Power + from 5 V on a 5 V Arduino and from 3.3 V on a 3.3 V board, as Joy-IT wires it for the Raspberry Pi and micro:bit (Joy-IT SensorKit, KY-038). From 5 V, AO and DO can swing to 5 V, above an ESP32's, ESP8266's or Pico's 3.3 V input limit.
- AO must go to an analog input. The Raspberry Pi has no analog inputs, so Joy-IT reads AO there through an external I2C ADC such as the KY-053 (ADS1115) (Joy-IT SensorKit, KY-038).
- Read loudness from AO as a swing, not a single sample: take readings over 20 to 50 ms and use the highest minus the lowest. Where AO sits at rest depends on the potentiometer and the supply.
- DO stays HIGH for the length of a loud sound and can chatter, so count one clap and then ignore DO for a few hundred milliseconds.
- On an ESP32 running Wi-Fi, use an ADC1 pin for AO: ADC2 is shared with the radio and does not read while Wi-Fi is on (Espressif ESP-IDF ADC documentation).
Specifications
- Pins
- AO (analog), G (GND), + (VCC), DO (digital)Joy-IT SensorKit, KY-038 pin assignment
- Supply
- 5 V on Arduino, 3.3 V on Raspberry Pi and micro:bit in the maker's wiringJoy-IT SensorKit, KY-038 pin assignment
- AO behaviour
- Raw microphone signal, inverted: louder gives a lower voltageJoy-IT SensorKit, KY-038
- DO behaviour
- HIGH, with LED2 lit, while the sound exceeds the potentiometer thresholdJoy-IT SensorKit, KY-038
- Comparator
- LM393, open-collector outputJoy-IT SensorKit, KY-038; TI LM393 datasheet (SLCS005AH), p. 17
- LM393 supply range
- 2 V to 30 VTI LM393 datasheet (SLCS005AH), p. 4
- LM393 response time
- 1.3 µs typicalTI LM393 datasheet (SLCS005AH), p. 1
- LM393 supply current
- 1 mA maximum at 5 VTI LM393 datasheet (SLCS005AH), p. 8
- Supply voltage
- 3.3–5 V
- Maximum supply voltage
- 5.5 V
- Interface
- Analog
- Dimensions
- 15 × 11.6 × 42 mm
- Weight
- 3.1 g
From the Keyes (generic)'s datasheet, published by Keyes (generic).
Common mistakes
Expecting it to hear speech
AO is the capsule's raw signal with no amplifier, so a normal voice moves it by a count or two. Use claps, knocks or loud noises, or switch to an amplified or I2S microphone for voice.
Comparing one AO sample with 512
AO's resting level moves with the potentiometer and the supply, and sound is a waveform around it. Measure the rest level at start-up and use the peak-to-peak swing over a short window instead.
LED2 always on or never on
The potentiometer sets the threshold and its useful range is narrow. Turn it until LED2 just goes out in silence, then test with a clap; if it stays on, turn the other way (Joy-IT SensorKit, KY-038).
5 V outputs into a 3.3 V board
With + on 5 V, AO and DO can reach 5 V. On an ESP32, ESP8266 or Pico, power the module from 3.3 V as the maker does on the Raspberry Pi (Joy-IT SensorKit, KY-038).
Counting one clap several times
DO follows the sound wave and toggles during one clap. Debounce it: register the first HIGH, then ignore DO for 200 to 300 ms.
KY-038 Sound Sensor questions
Can I use the KY-038 with an ESP32 or Raspberry Pi Pico at 3.3 V?
Yes. Joy-IT powers it from 3.3 V on the Raspberry Pi, micro:bit and Pico (Joy-IT SensorKit, KY-038), and its LM393 runs from 2 V upward (TI LM393 datasheet, p. 4). Power it from 3.3 V on 3.3 V boards so AO and DO stay within the GPIO limit.
Can the KY-038 measure decibels?
No. It has no amplifier and no calibration, so AO gives a relative swing, not a sound pressure level. Use it to detect loud events; for a calibrated level use a dedicated sound level meter or a calibrated digital microphone.
Why does my KY-038 not react when I talk?
Speech is too quiet for an unamplified electret capsule to move AO much, and the DO threshold is usually set above it. Test with a clap close to the microphone, then adjust the potentiometer until LED2 just flickers on the clap (Joy-IT SensorKit, KY-038).
What is the difference between AO and DO on the KY-038?
AO is the microphone's direct, inverted analog signal; DO is the LM393 comparator's output, HIGH while the sound is above the potentiometer threshold (Joy-IT SensorKit, KY-038). Use DO for a clap switch and AO for a relative loudness reading.
KY-038 or INMP441: which microphone should I use?
Use the KY-038 for clap switches and noise triggers on any board with an analog input. Use the INMP441 when you need real audio, such as recording, voice or sound analysis: it is a digital I2S microphone that needs an I2S-capable board such as an ESP32.
Build something with the KY-038 Sound Sensor
- Build this
Clap switch
Toggle a lamp or relay with two claps in a row.
- Build this
Noise alarm
Flash a warning when the room gets louder than a set threshold.
- Build this
Sound-reactive LEDs
Flash LEDs or a NeoPixel strip on each beat or bang picked up by DO.
- Build this
Knock detector
Mount it on a door or box and react to a knock pattern.
This page as plain Markdown, for ChatGPT, Claude or your own agent. /components/sound-sensor-ky-038.md