FC-51 IR Obstacle Sensor
An infrared reflection switch whose OUT pin goes LOW when something comes within reach, rated 2 to 30 cm.
- Supply voltage3.3 V to 5 V DC
- OutputDigital OUT, LOW with the green LED on when an obstacle is detected
- Detection range2 to 30 cm, set by the on-board potentiometer
- Detection angle35°
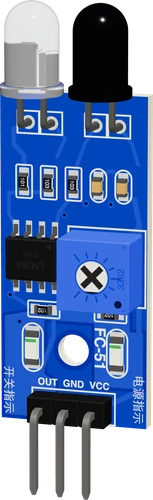
The FC-51 (also sold as the HW-201) is an infrared obstacle sensor: an IR LED and a receiver look forward, and an LM393 comparator pulls OUT LOW and lights a green LED when something reflects enough light back, rated for 2 to 30 cm over a 35° angle (HW-201 module sheet, p. 1). Wire VCC to 3.3 V or 5 V, GND to GND and OUT to any digital pin (p. 2); on a 3.3 V board such as an ESP32 or Pico, power it from 3.3 V so OUT never rises above 3.3 V.
The FC-51, also sold as the HW-201, is the small blue infrared obstacle sensor found on most beginner robot cars. An infrared LED shines forward next to an infrared receiver; when an object in front reflects enough of that light back, an LM393 comparator switches the OUT pin LOW and lights the green indicator. A red LED shows the board is powered (HW-201 module sheet, pp. 1, 2).
It is a near or not-near switch, not a distance sensor. There is no analog output, only the digital OUT pin. A potentiometer on the board sets how far it reaches: clockwise increases the detection distance, counter-clockwise reduces it. The module sheet rates it from 2 to 30 cm with a 35° detection angle, and the boards ship with the threshold already set (pp. 1, 2).
How far it actually sees depends on the target. It measures reflected light, so the module sheet notes that black surfaces give the shortest detection distance and white the longest, and that small objects are seen closer than large ones (p. 1). Glass, matte black and strong sunlight are the usual trouble cases; for a real distance in centimetres use an HC-SR04 or a VL53L0X instead.
FC-51 IR Obstacle Sensor pinout
| Pin | Function | Type |
|---|---|---|
| VCC | VCC (3.3-5 V)3.3–5 V | power in |
| GND | GND | power in |
| OUT | Digital | output |
How to wire the FC-51 IR Obstacle Sensor
Pin by pin, for the board you have.
| FC-51 IR Obstacle Sensor | Arduino Uno | Note |
|---|---|---|
| VCC | 5V | |
| GND | GND | |
| OUT | D2 |
| FC-51 IR Obstacle Sensor | ESP32 DevKit V1 | Note |
|---|---|---|
| VCC | 3V3 | |
| GND | GND | |
| OUT | GPIO13 (D13) |
| FC-51 IR Obstacle Sensor | Raspberry Pi Pico | Note |
|---|---|---|
| VCC | 3V3 | |
| GND | GND | |
| OUT | GP0 |
FC-51 IR Obstacle Sensor code
Every example here compiles for its board.
// FC-51 IR Obstacle Sensor on Arduino Uno: wiring and a free simulation at https://www.tinkered.ai/components/ir-obstacle-sensor-fc-51
const int OUT_PIN = 2;    // FC-51 OUT: LOW while something is in front
const int LED_PIN = 13;   // the warning LED

int lowReads = 0;         // consecutive reads with OUT LOW
int highReads = 0;        // consecutive reads with OUT HIGH
bool blocked = false;     // what the sketch believes, after the chatter
unsigned long count = 0;  // objects seen arriving

void setup() {
  Serial.begin(9600);
  pinMode(OUT_PIN, INPUT); // the module has its own pull-up
  pinMode(LED_PIN, OUTPUT);
  Serial.println("FC-51 ready");
}

void loop() {
  if (digitalRead(OUT_PIN) == LOW) { lowReads++; highReads = 0; }
  else { highReads++; lowReads = 0; }

  // 3 reads in a row (30 ms) to change its mind: the comparator has no hysteresis
  if (!blocked && lowReads >= 3) {
    blocked = true;
    count++;
    digitalWrite(LED_PIN, HIGH);
    Serial.print("Obstacle! count=");
    Serial.println(count);
  } else if (blocked && highReads >= 3) {
    blocked = false;
    digitalWrite(LED_PIN, LOW);
    Serial.println("clear");
  }
  delay(10);
}
Before you wire it
- VCC to the board's 5 V on an Uno, Nano, Mega or UNO R4; to 3V3 on an ESP32, ESP32-S3, ESP32-C3, ESP8266 or Pico (OUT is pulled up to VCC: on 5 V it reaches 5 V, over a 3.3 V pin's limit). GND to GND.
- OUT to a digital input with pinMode(pin, INPUT): the module has its own pull-up. LOW means obstacle.
- The comparator has no hysteresis: at the edge of its reach OUT chatters. Treat an obstacle as OUT LOW for a few consecutive reads (20-30 ms), and "clear" as HIGH for a few, before acting.
- To count objects passing (a counter, a gate), count falling edges: attachInterrupt(digitalPinToInterrupt(pin), isr, FALLING), the ISR only incrementing a volatile counter, and ignore edges within 50 ms of the last (the chatter). On an ESP8266 or ESP32 the ISR must be void IRAM_ATTR isr() (an ESP8266 aborts at attachInterrupt() without it); for a sketch that also builds for an Arduino, add #ifndef IRAM_ATTR / #define IRAM_ATTR / #endif at the top.
- No analogRead() of this module and no distance from it: it has no AO pin and says only near / not near.
- No "OUT HIGH means obstacle": LOW means obstacle.
- No 5 V on VCC with a 3.3 V board (ESP32, ESP8266, Pico).
- No VCC from a GPIO pin.
- No extra pull-up or pull-down on OUT: the module has its own 10 kΩ.
- Do not promise it sees black or glass objects, or works in direct sunlight.
- Power VCC from 3.3 V or 5 V (HW-201 module sheet, p. 2). The OUT pull-up goes to VCC, so on an ESP32, ESP8266 or Raspberry Pi Pico power the module from 3.3 V; then OUT never exceeds the GPIO's 3.3 V limit.
- Read OUT with pinMode(pin, INPUT). The board already pulls OUT up, so no external resistor is needed. LOW means an obstacle (p. 1).
- Take power from the board's 5 V or 3V3 pin, not from a GPIO: the IR LED shines continuously and draws more than a GPIO is meant to supply.
- The comparator switches with no hysteresis at the edge of its reach, so OUT can chatter as an object approaches. Require a few consecutive LOW readings before acting, and debounce edges when you count objects.
- Turn the potentiometer clockwise for more reach and counter-clockwise for less (p. 1). If the green LED stays on with nothing in front, turn it back until the LED goes out, then a little further.
- Detection range is 2 to 30 cm (HW-201 sheet).
Specifications
- Supply voltage
- 3.3 V to 5 V DCHW-201 module sheet, pp. 1, 2
- Output
- Digital OUT, LOW with the green LED on when an obstacle is detectedHW-201 module sheet, p. 1
- Detection range
- 2 to 30 cm, set by the on-board potentiometerHW-201 module sheet, p. 1
- Detection angle
- 35°HW-201 module sheet, p. 1
- Comparator
- LM393 dual comparator, open-collector outputHW-201 module sheet, p. 1; TI LM393 datasheet (SLCS005AH), p. 17
- LM393 output sink current
- 6 mA minimum at VOL = 1.5 VTI LM393 datasheet (SLCS005AH), p. 8
- LM393 input range
- 0 V to VCC minus 1.5 V at 25 °CTI LM393 datasheet (SLCS005AH), p. 8
- Board size
- 3.2 × 1.4 cm, 3 mm mounting holeHW-201 module sheet, p. 2
- Pins
- VCC, GND, OUTHW-201 module sheet, p. 2
- Maximum supply voltage
- 5.5 V
- Interface
- Digital
- Dimensions
- 14.2 × 7.5 × 45.9 mm
- Weight
- 2.5 g
From the Generic (FC-51 / HW-201)'s datasheet, published by Generic (FC-51 / HW-201).
Common mistakes
Reading OUT HIGH as an obstacle
OUT is active LOW: it drops to LOW and the green LED lights when something is in front (HW-201 module sheet, p. 1). Code that waits for HIGH reacts to empty space instead.
Expecting a distance from it
The FC-51 has no analog pin and gives only obstacle or no obstacle. analogRead() on OUT returns only its two levels. For a distance use an ultrasonic HC-SR04 or a VL53L0X time-of-flight sensor.
Powering it from 5 V on a 3.3 V board
OUT is pulled up to the module's own supply, so on 5 V it swings to 5 V, above an ESP32's, ESP8266's or Pico's 3.3 V input limit. The module runs from 3.3 V (p. 2), so power it from 3V3 there.
Testing against black or shiny targets
It measures reflected infrared, so black surfaces are seen only at the shortest distance and white ones at the longest (p. 1). Test with a white card first, then expect less reach from dark or glossy objects.
Potentiometer turned too far
Turned far clockwise, the threshold leaves the LM393's working input range (0 V to VCC minus 1.5 V, TI datasheet p. 8) and OUT can stick LOW with the green LED always on. Back it off until the LED is off with nothing in front.
FC-51 IR Obstacle Sensor questions
Can I use the FC-51 with an ESP32 or Raspberry Pi Pico?
Yes. Power VCC from the board's 3.3 V pin, which the module supports (HW-201 module sheet, p. 2), and wire OUT to any digital GPIO. Because OUT is pulled up to the module's VCC, running it from 3.3 V keeps the signal safe for 3.3 V inputs.
Is the FC-51 output HIGH or LOW when it detects an obstacle?
LOW. When an object reflects enough infrared back, the comparator pulls OUT LOW and the green indicator lights; with nothing in front OUT stays HIGH (HW-201 module sheet, p. 1).
How far can the FC-51 detect?
The module sheet rates it from 2 to 30 cm over a 35° angle, adjusted with the potentiometer (HW-201 module sheet, p. 1). The real reach depends on the target's reflectivity: white objects are seen farthest and black ones only up close (p. 1).
Why is my FC-51 always detecting something?
Either the potentiometer is turned too far clockwise or direct sunlight is reaching the receiver. Turn the potentiometer counter-clockwise until the green LED goes out with nothing in front (p. 1), and shade the sensor from the sun.
Why does my FC-51 count one object several times?
At the edge of its range the LM393 switches back and forth before settling, so one object can produce several falling edges. Count an object only after OUT has stayed LOW for a few readings, and ignore edges that follow too quickly.
FC-51 or HC-SR04: which should I use?
Use the FC-51 when you only need to know that something is close, such as a robot bumper or an object counter; it has one digital output and rates 2 to 30 cm (HW-201 module sheet, p. 1). Use the HC-SR04 when you need a distance number, which it measures from 2 to 400 cm (ElecFreaks HC-SR04 datasheet, p. 1).
Build something with the FC-51 IR Obstacle Sensor
- Build this
Obstacle-avoiding robot car
Mount two angled left and right at the front and steer away from whichever side goes LOW.
- Build this
Object counter
Count parts passing on a conveyor or people through a doorway by counting OUT's falling edges.
- Build this
Touchless trigger
Wave a hand in front to switch a light, a pump or a servo without touching anything.
- Build this
Edge or table-drop detector
Point it down at the floor so a robot stops when the surface disappears.
This page as plain Markdown, for ChatGPT, Claude or your own agent. /components/ir-obstacle-sensor-fc-51.md