MPR121
A 12-channel capacitive touch controller on Adafruit's breakout, turning foil, fruit or wire into touch buttons over I2C.
- Chip supply1.71 V to 3.6 V; absolute maximum 3.6 V
- Current29 µA typical at 16 ms sampling, 3 µA in stop mode
- Electrodes12 touch inputs (8 also usable as GPIO or LED drivers) plus a 13th proximity channel
- I2C addressADDR to VSS 0x5A, VDD 0x5B, SDA 0x5C, SCL 0x5D
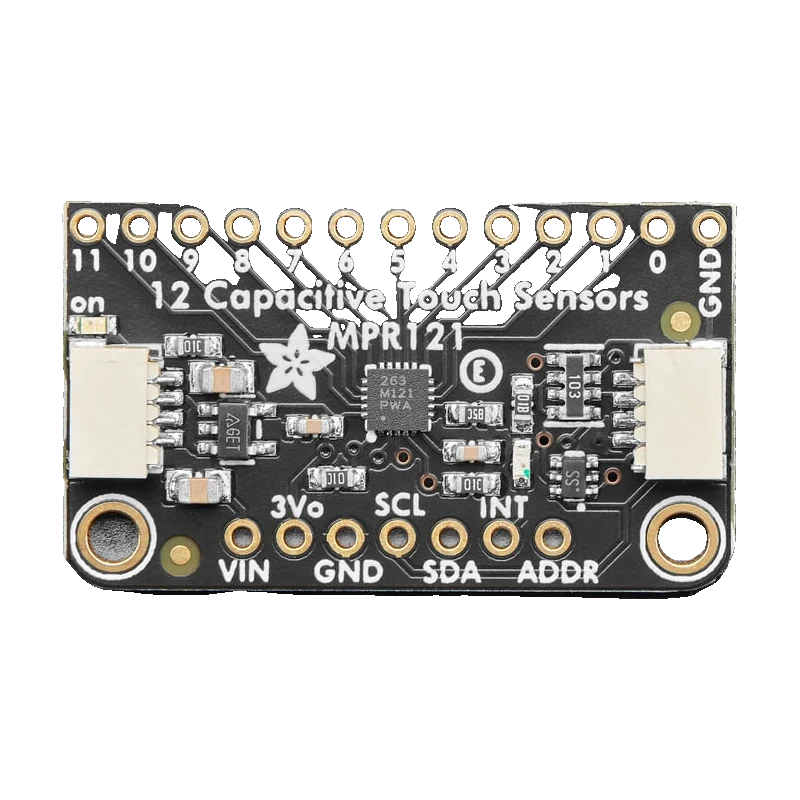
The MPR121 reads 12 capacitive touch electrodes over I2C, runs from 1.71 V to 3.6 V and draws 29 µA at a 16 ms sampling interval (NXP MPR121 Data Sheet Rev. 4, p. 1). Its address is 0x5A, 0x5B, 0x5C or 0x5D depending on where ADDR connects (p. 2); Adafruit's breakout holds ADDR low for 0x5A and adds a 3.3 V regulator and I2C level shifting so Vin can be 3 V to 5 V (Adafruit MPR121 guide, Pinouts; product 1982). The Adafruit_MPR121 library returns all 12 touch states in one call.
The MPR121 measures the capacitance of up to 12 electrodes and decides on its own when each one is touched, with automatic calibration, separate touch and release thresholds and filtering inside the chip (NXP MPR121 Data Sheet Rev. 4, p. 1). The microcontroller just reads a 12-bit touch status, or waits for the IRQ line to fall.
Electrodes can be almost anything conductive: copper tape, conductive paint, a screw, a piece of fruit or a wire to a metal plate. A 13th virtual electrode combines all inputs for proximity sensing (p. 1). That flexibility is why the MPR121 shows up in touch pianos, interactive art and hidden switches behind thin plastic.
The chip is 3.6 V maximum (p. 8), so Adafruit's breakout adds a 3.3 V regulator and I2C level shifting, and asks for Vin at the same voltage as your board's logic (Adafruit MPR121 guide, Pinouts). Four addresses let up to four boards share one bus, 48 touch inputs in all (Adafruit product 1982).
MPR121 pinout
| Pin | Function | Type |
|---|---|---|
| Vin | Supply3 V to 5 V, same as your board's logic | power in |
| 3Vo | 3.3 V regulator output | power out |
| GND | Ground | power in |
| SCL | I2C SCLLevel shifted | input |
| SDA | I2C SDALevel shifted | bidirectional |
| INT | Interrupt (active low)Pulled up to 3.3 V | open collector |
| ADDR | I2C address select | input |
| 0-11 | Touch electrodes | passive |
How to wire the MPR121
Pin by pin, for the board you have.
| MPR121 | Arduino Uno | Note |
|---|---|---|
| Vin | 5V | |
| GND | GND | |
| SCL | A5 (SCL) | |
| SDA | A4 (SDA) | |
| 0 to 11 | Touch pads (copper tape, foil, wires) |
| MPR121 | ESP32 DevKit V1 | Note |
|---|---|---|
| Vin | 3V3 | |
| GND | GND | |
| SCL | GPIO22 (D22) | |
| SDA | GPIO21 (D21) | |
| 0 to 11 | Touch pads (copper tape, foil, wires) |
- Power Vin from 3V3, not VIN: Adafruit asks for the same voltage as the board's logic, which keeps the I2C lines at 3.3 V.
| MPR121 | Raspberry Pi Pico | Note |
|---|---|---|
| Vin | 3V3(OUT) | |
| GND | GND | |
| SCL | GP5 | |
| SDA | GP4 | |
| 0 to 11 | Touch pads (copper tape, foil, wires) |
- Power Vin from 3V3(OUT), not VBUS, so the level-shifted I2C lines sit at 3.3 V.
MPR121 code
Every example here compiles for its board.
// MPR121 on Arduino Uno: wiring and a free simulation at https://www.tinkered.ai/components/mpr121-touch
// Adafruit MPR121 on an Arduino Uno: SDA A4, SCL A5, address 0x5A
#include <Wire.h>
#include <Adafruit_MPR121.h>

Adafruit_MPR121 cap;
uint16_t lastTouched = 0;

void setup() {
  Serial.begin(115200);
  if (!cap.begin(0x5A)) {
    Serial.println(F("MPR121 not found at 0x5A: check wiring and ADDR"));
    while (true) {}
  }
  Serial.println(F("MPR121 ready: touch the pads"));
}

void loop() {
  uint16_t touched = cap.touched(); // bit n = electrode n
  for (uint8_t i = 0; i < 12; i++) {
    bool now = touched & (1 << i);
    bool before = lastTouched & (1 << i);
    if (now && !before) {
      Serial.print(F("Pad "));
      Serial.print(i);
      Serial.println(F(" touched"));
    }
    if (!now && before) {
      Serial.print(F("Pad "));
      Serial.print(i);
      Serial.println(F(" released"));
    }
  }
  lastTouched = touched;
  delay(20);
}
// MPR121 on ESP32 DevKit V1: wiring and a free simulation at https://www.tinkered.ai/components/mpr121-touch
// Adafruit MPR121 on an ESP32 DevKit V1: SDA GPIO21, SCL GPIO22, address 0x5A
#include <Wire.h>
#include <Adafruit_MPR121.h>

Adafruit_MPR121 cap;
uint16_t lastTouched = 0;

void setup() {
  Serial.begin(115200);
  Wire.begin(21, 22); // SDA, SCL
  if (!cap.begin(0x5A, &Wire)) {
    Serial.println("MPR121 not found at 0x5A: check wiring and ADDR");
    while (true) { delay(100); }
  }
  Serial.println("MPR121 ready: touch the pads");
}

void loop() {
  uint16_t touched = cap.touched();
  for (uint8_t i = 0; i < 12; i++) {
    bool now = touched & (1 << i);
    bool before = lastTouched & (1 << i);
    if (now && !before) Serial.printf("Pad %u touched\n", i);
    if (!now && before) Serial.printf("Pad %u released\n", i);
  }
  lastTouched = touched;
  delay(20);
}
// MPR121 on Raspberry Pi Pico: wiring and a free simulation at https://www.tinkered.ai/components/mpr121-touch
// Adafruit MPR121 on a Raspberry Pi Pico (arduino-pico): SDA GP4, SCL GP5, address 0x5A
#include <Wire.h>
#include <Adafruit_MPR121.h>

Adafruit_MPR121 cap;
uint16_t lastTouched = 0;

void setup() {
  Serial.begin(115200);
  Wire.setSDA(4);
  Wire.setSCL(5);
  if (!cap.begin(0x5A, &Wire)) {
    Serial.println("MPR121 not found at 0x5A: check wiring and ADDR");
    while (true) { delay(100); }
  }
  Serial.println("MPR121 ready: touch the pads");
}

void loop() {
  uint16_t touched = cap.touched();
  for (uint8_t i = 0; i < 12; i++) {
    bool now = touched & (1 << i);
    bool before = lastTouched & (1 << i);
    if (now && !before) {
      Serial.print("Pad ");
      Serial.print(i);
      Serial.println(" touched");
    }
    if (!now && before) {
      Serial.print("Pad ");
      Serial.print(i);
      Serial.println(" released");
    }
  }
  lastTouched = touched;
  delay(20);
}
Before you wire it
- Power Vin at the same voltage as your board's logic: 5V on an Uno, 3.3 V on an ESP32 or a Pico (Adafruit MPR121 guide, Pinouts).
- Give each MPR121 on a shared bus its own address with ADDR: 0x5A to 0x5D (NXP MPR121 Data Sheet Rev. 4, p. 2).
- Keep electrode wires short and apart from each other; long parallel wires couple and trigger neighbours.
- Let the chip calibrate with nothing touching the pads for a moment after power-up or begin().
- Never put more than 3.6 V on the bare MPR121 chip (p. 8); on boards without Adafruit's regulator, power it from 3.3 V.
- Never touch the pads while the sketch starts: the baseline is learned then.
- Never leave electrode pins connected to long unshielded cables near mains or motors; noise reads as touches.
- Adafruit's board pulls ADDR to GND through 100 kΩ, so it answers at 0x5A unless ADDR is tied to 3Vo, SDA or SCL (Adafruit MPR121 guide, Pinouts).
- INT goes low when any electrode changes state; wiring it to an interrupt pin avoids polling the bus in battery projects.
- Unused electrodes can stay unconnected; the library configures all 12.
- Touch through up to a few millimetres of plastic or glass works; thicker covers need lower thresholds via setThresholds().
- Many cheap blue MPR121 boards have no regulator or level shifting: they are 3.3 V only, and their I2C pull-ups may be missing.
Specifications
- Chip supply
- 1.71 V to 3.6 V; absolute maximum 3.6 VNXP MPR121 Data Sheet Rev. 4, pp. 1, 8
- Current
- 29 µA typical at 16 ms sampling, 3 µA in stop modeNXP MPR121 Data Sheet Rev. 4, p. 1
- Electrodes
- 12 touch inputs (8 also usable as GPIO or LED drivers) plus a 13th proximity channelNXP MPR121 Data Sheet Rev. 4, p. 1
- I2C address
- ADDR to VSS 0x5A, VDD 0x5B, SDA 0x5C, SCL 0x5DNXP MPR121 Data Sheet Rev. 4, p. 2
- I2C clock
- Up to 400 kHzNXP MPR121 Data Sheet Rev. 4, p. 10
- Pin voltage limit (chip)
- SCL, SDA, IRQ: VSS - 0.3 V to VDD + 0.3 VNXP MPR121 Data Sheet Rev. 4, Table 3, p. 8
- Breakout power
- Vin 3 V to 5 V through a 3.3 V regulator; 3Vo gives up to 100 mAAdafruit MPR121 guide, Pinouts
- Breakout logic
- I2C level shifting for 3 V or 5 V boards; ADDR pulled to GND with 100 kΩ (0x5A); INT pulled up to 3.3 VAdafruit product 1982 page; Adafruit MPR121 guide, Pinouts
From the Freescale/NXP MPR121 Data Sheet Rev. 4, 02/2013, published by NXP (formerly Freescale).
Common mistakes
Wrong address
The address depends on ADDR: 0x5A to ground, 0x5B to VDD, 0x5C to SDA, 0x5D to SCL (NXP MPR121 Data Sheet Rev. 4, p. 2). Some generic boards solder ADDR to a different rail; run an I2C scanner and pass the address to begin().
Pads that trigger by themselves
Long electrode wires, wires running next to each other or a finger on a pad at startup upset the baseline. Shorten and separate the wires and reset with nothing touching.
5 V on a bare 3.3 V board
The MPR121 chip's absolute maximum is 3.6 V (p. 8). Adafruit's breakout regulates and shifts levels, but many generic boards do not and are damaged by 5 V.
Touches missed through a thick cover
Default thresholds suit bare pads. Behind plastic, lower the touch and release thresholds with setThresholds() until touches register reliably.
MPR121 questions
What is the MPR121's I2C address?
0x5A by default on Adafruit's board, where ADDR is pulled to ground. Connecting ADDR to VDD, SDA or SCL gives 0x5B, 0x5C or 0x5D (NXP MPR121 Data Sheet Rev. 4, p. 2), so four boards can share one bus.
Can I use the MPR121 with a 5 V Arduino?
Adafruit's breakout, yes: it has a 3.3 V regulator and I2C level shifting, so power Vin from 5V (Adafruit product 1982). The bare chip is 3.6 V maximum (p. 8), so generic boards without those parts need 3.3 V and 3.3 V logic.
Which library should I use?
Adafruit_MPR121 (adafruit/Adafruit MPR121). touched() returns a 12-bit mask of the pads being touched, and filteredData() and baselineData() help tune thresholds.
MPR121 or TTP223?
A TTP223 board is a single touch button with a digital output. The MPR121 handles 12 pads, has adjustable thresholds and reports over I2C, which suits keypads, pianos and multi-button interfaces.
What can I use as touch electrodes?
Anything conductive: copper tape, aluminium foil, conductive paint or thread, screws, even fruit. Keep each pad's wire short and separate, and make pads at least fingertip-sized.
Build something with the MPR121
- Build this
Fruit piano
Twelve pieces of fruit play twelve notes.
- Build this
Hidden touch switches
Copper pads behind a wooden panel control lights.
This page as plain Markdown, for ChatGPT, Claude or your own agent. /components/mpr121-touch.md