ADS1115 16-Bit ADC with a Raspberry Pi Pico
A 16-bit, four-input I2C analog-to-digital converter with a programmable gain amplifier, from ±0.256 V to ±6.144 V full scale.
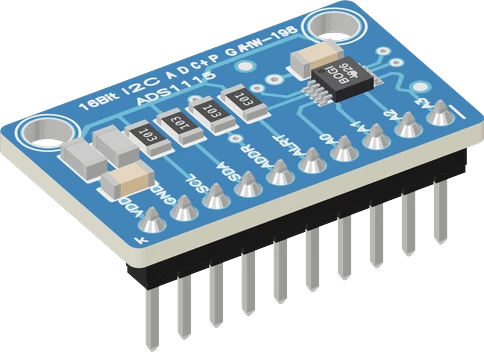
The ADS1115 gives the Raspberry Pi Pico four 16-bit inputs on I2C, beside the three 12-bit ADC pins (GP26 to GP28) the board has of its own. On this page it sits on I2C0 (SDA GP4, SCL GP5), arduino-pico's default Wire bus, powered from 3V3 at address 0x48.
Wiring the ADS1115 16-Bit ADC to the Raspberry Pi Pico
Pin by pin.
| ADS1115 16-Bit ADC | Raspberry Pi Pico |
|---|---|
| VDD | 3V3 |
| GND | GND |
| SDA | GP4 |
| SCL | GP5 |
What to know on the Raspberry Pi Pico
- The Pico's own ADC uses its 3.3 V supply as reference and Raspberry Pi notes an inherent offset of about 30 mV from the filter on that supply; the ADS1115 measures against its own internal reference, which suits small or precise signals.Raspberry Pi Pico datasheet, release 21, p. 19
- With VDD on 3V3, every ADS1115 input must stay between GND - 0.3 V and VDD + 0.3 V, about 3.6 V, whatever the gain. A 5 V signal still needs a divider.TI ADS111x datasheet SBAS444E, p. 4
- The sketch sets GAIN_TWOTHIRDS (±6.144 V). On a 3.3 V supply no input can exceed about 3.6 V, so GAIN_ONE (±4.096 V) gives finer steps for 0 to 3.3 V signals.TI ADS111x datasheet SBAS444E, pp. 4, 15
ADS1115 16-Bit ADC code for the Raspberry Pi Pico
Compiled for rp2040:rp2040:rpipico on 2026-10-30.
// ADS1115 16-Bit ADC on Raspberry Pi Pico: wiring and a free simulation at https://www.tinkered.ai/components/ads1115-adc/raspberry-pi-pico
#include <Arduino.h>
#include <Wire.h>
#include <Adafruit_ADS1X15.h>

Adafruit_ADS1115 ads;

void setup() {
  Serial.begin(115200);
  if (!ads.begin(0x48)) {
    Serial.println("ADS1115 not found: check VDD, SDA/SCL and the ADDR wiring");
    while (true) delay(10);
  }
  ads.setGain(GAIN_TWOTHIRDS);
}

void loop() {
  int16_t pot = ads.readADC_SingleEnded(0);
  int16_t tmp = ads.readADC_SingleEnded(1);
  float potV = ads.computeVolts(pot);
  float tempC = (ads.computeVolts(tmp) - 0.5f) * 100.0f;   // TMP36: 0.5 V at 0 °C, 10 mV/°C
  Serial.print("pot "); Serial.print(potV, 4); Serial.print(" V  ");
  Serial.print("temp "); Serial.print(tempC, 2); Serial.println(" C");
  delay(500);
}
ADS1115 16-Bit ADC on the Raspberry Pi Pico: questions
Why use an ADS1115 when the Pico already has an ADC?
The Pico exposes three ADC inputs, GP26 to GP28, at 12 bits (Pico datasheet, pp. 3, 4), referenced to its own 3.3 V rail with an offset of about 30 mV (p. 19). The ADS1115 adds four inputs at 16 bits with an internal reference and gains down to ±0.256 V (TI SBAS444E, p. 15).
Can I use other I2C pins on the Pico?
Yes. Call Wire.setSDA() and Wire.setSCL() with another I2C0 pin pair before ads.begin(); the page uses arduino-pico's defaults, GP4 and GP5.
How many ADS1115 modules can share the Pico's bus?
Four: ADDR to GND, VDD, SDA or SCL gives 0x48, 0x49, 0x4A or 0x4B (TI SBAS444E, p. 20). Give each its own Adafruit_ADS1115 object and begin() address.
Keep going
This guide as plain Markdown. /components/ads1115-adc/raspberry-pi-pico.md