KY-026 Flame Sensor
An infrared flame detector with an analog level output and a digital alarm output set by a potentiometer.
- PinsAO (analog), G (GND), + (VCC), DO (digital)
- Supply5 V on Arduino, 3.3 V on Raspberry Pi and micro:bit in the maker's wiring
- AO behaviourInverted: more infrared gives a lower voltage
- DO behaviourHIGH, with LED2 lit, once the potentiometer threshold is exceeded
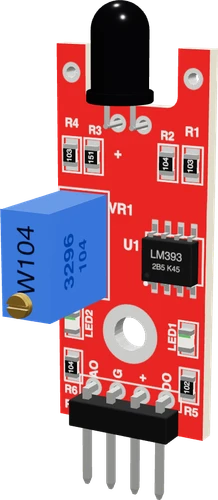
The KY-026 is an infrared flame sensor module: an IR-sensitive phototransistor feeds an analog output (AO), and an LM393 comparator drives a digital output (DO) that goes HIGH once the light passes a threshold set on its potentiometer (Joy-IT SensorKit, KY-026). Wire + to 5 V on an Arduino or 3.3 V on a 3.3 V board, G to GND, AO to an analog pin and DO to a digital pin; AO is inverted, so a flame makes its voltage fall (Joy-IT SensorKit, KY-026).
The KY-026 is the four-pin flame sensor from the Keyes KY sensor kit family, also sold in Joy-IT's SensorKit. Its sensing element is an infrared-sensitive phototransistor in a dark epoxy package, chosen because open flames give off strongly in the near infrared. Joy-IT describes it as particularly sensitive to the light spectrum produced by open flames (Joy-IT SensorKit, KY-026).
It has two outputs. AO is the direct measured value of the sensor and is inverted: more infrared gives a lower voltage. DO comes from an LM393 comparator that checks the sensor against a threshold set with the on-board potentiometer; it goes HIGH and lights the second LED once the threshold is exceeded. The first LED shows the board is powered (Joy-IT SensorKit, KY-026).
Because it sees infrared light rather than fire itself, sunlight, daylight through a window and incandescent bulbs can trip it as well. It suits flame-presence demos, candle detectors and fire-fighting robot contests. It is not a smoke detector or a certified fire alarm; for a level reading use AO, for a simple alarm use DO.
KY-026 Flame Sensor pinout
| Pin | Function | Type |
|---|---|---|
| AO | ADC near VCC in the dark, falls with infrared | output |
| GND | G (GND) | power in |
| VCC | + (3.3-5.5 V)3.3–5 V | power in |
| DO | Digital | output |
How to wire the KY-026 Flame Sensor
Pin by pin, for the board you have.
| KY-026 Flame Sensor | Arduino Uno | Note |
|---|---|---|
| VCC | 5V | |
| GND | GND | |
| AO | A0 | |
| DO | D2 | |
| Buzzer + | D8 | optional: an active buzzer, its − to GND; the sketch sounds it while DO sees a flame |
| KY-026 Flame Sensor | ESP32 DevKit V1 | Note |
|---|---|---|
| VCC | 3V3 | |
| GND | GND | |
| AO | GPIO33 (D33) | |
| DO | GPIO13 (D13) |
| KY-026 Flame Sensor | Raspberry Pi Pico | Note |
|---|---|---|
| VCC | 3V3 | |
| GND | GND | |
| AO | GP28 | |
| DO | GP0 |
KY-026 Flame Sensor code
Every example here compiles for its board.
// KY-026 Flame Sensor on Arduino Uno: wiring and a free simulation at https://www.tinkered.ai/components/flame-sensor-ky-026
const int AO_PIN = A0;     // KY-026 AO: near 1023 in the dark, falls with infrared
const int DO_PIN = 2;      // KY-026 DO: HIGH while it sees a flame
const int BUZZER_PIN = 8;  // an active buzzer: sounds while driven HIGH

int rest = 1023;           // AO with no flame, measured at start-up
unsigned long lastPrint = 0;

int readAo() {
  long sum = 0;
  for (int i = 0; i < 16; i++) sum += analogRead(AO_PIN);
  return sum / 16;         // a flame flickers: average it
}

void setup() {
  Serial.begin(9600);
  pinMode(DO_PIN, INPUT);  // the module has its own pull-up
  pinMode(BUZZER_PIN, OUTPUT);
  rest = readAo();
  Serial.println("KY-026 ready");
}

void loop() {
  int ao = readAo();
  bool flame = digitalRead(DO_PIN) == HIGH;
  // how much infrared, as a percent of the way from the rest level down to 0
  int level = rest > 0 ? constrain(100L * (rest - ao) / rest, 0, 100) : 0;

  digitalWrite(BUZZER_PIN, flame ? HIGH : LOW);

  if (millis() - lastPrint >= 500) {
    lastPrint = millis();
    Serial.print("AO ");
    Serial.print(ao);
    Serial.print("  IR ");
    Serial.print(level);
    Serial.print(" %  ");
    Serial.println(flame ? "FLAME" : "clear");
  }
}
Before you wire it
- + (VCC) to the board's 5 V on an Uno, Nano, Mega or UNO R4; to 3V3 on an ESP32, ESP32-S3, ESP32-C3, ESP8266 or Pico (on 5 V its AO and DO reach 5 V, over a 3.3 V pin's limit). G (GND) to GND.
- AO to an ANALOG input: A0-A5 on an Uno, Nano or UNO R4, A0-A15 on a Mega, GP26-GP28 on a Pico, A0 on an ESP8266 NodeMCU, an ADC1 pin on an ESP32 (GPIO32-39; GPIO0-4 on a C3, GPIO1-10 on an S3).
- DO to a digital input with pinMode(pin, INPUT): the module has its own 10 kΩ pull-up (R1). HIGH means flame.
- Read AO as "lower is more infrared": a flame is a FALL from the rest level. Compare with a threshold under the rest reading (for example rest * 0.7), or with a baseline averaged at start-up.
- Smooth AO over a few reads (a real flame flickers by a few percent): average 8-16 samples or require the flame for several loops before alarming.
- No "AO rises with fire": it falls.
- No analogRead() on DO, no digitalRead() on AO.
- No 5 V on + with a 3.3 V board (ESP32, ESP8266, Pico).
- No ESP32 ADC2 pin (GPIO 0/2/4/12-15/25-27) for AO when the sketch uses Wi-Fi: ADC2 reads nothing while the radio runs. GPIO5 on an ESP32-C3 is ADC2: the Arduino core refuses analogRead there.
- Do not call it a smoke, heat or fire-safety detector: it sees infrared light only, and daylight or a bulb trips it.
- Power + from 5 V on a 5 V Arduino and from 3.3 V on a 3.3 V board, as Joy-IT wires it for the Raspberry Pi and micro:bit (Joy-IT SensorKit, KY-026). Powered from 5 V, AO and DO can swing to 5 V, which is above an ESP32's, ESP8266's or Pico's 3.3 V input limit.
- AO must go to an analog input. The Raspberry Pi has no analog inputs, so Joy-IT reads AO there through an external I2C ADC such as the KY-053 (ADS1115) (Joy-IT SensorKit, KY-026).
- DO is a plain digital input with pinMode(pin, INPUT); the board pulls it up. It reads HIGH while a flame is detected (Joy-IT SensorKit, KY-026).
- On an ESP32 running Wi-Fi, use an ADC1 pin for AO: ADC2 is shared with the radio and does not read while Wi-Fi is on (Espressif ESP-IDF ADC documentation).
- A real flame flickers, so average several AO samples, or require DO HIGH for a few loops, before raising an alarm.
- The sensing element is a photodiode (Joy-IT).
Specifications
- Pins
- AO (analog), G (GND), + (VCC), DO (digital)Joy-IT SensorKit, KY-026 pin assignment
- Supply
- 5 V on Arduino, 3.3 V on Raspberry Pi and micro:bit in the maker's wiringJoy-IT SensorKit, KY-026 pin assignment
- AO behaviour
- Inverted: more infrared gives a lower voltageJoy-IT SensorKit, KY-026
- DO behaviour
- HIGH, with LED2 lit, once the potentiometer threshold is exceededJoy-IT SensorKit, KY-026
- Comparator
- LM393, open-collector outputJoy-IT SensorKit, KY-026; TI LM393 datasheet (SLCS005AH), p. 17
- LM393 supply range
- 2 V to 30 VTI LM393 datasheet (SLCS005AH), p. 4
- LM393 response time
- 1.3 µs typicalTI LM393 datasheet (SLCS005AH), p. 1
- LM393 supply current
- 1 mA maximum at 5 VTI LM393 datasheet (SLCS005AH), p. 8
- Supply voltage
- 3.3–5 V
- Maximum supply voltage
- 5.5 V
- Interface
- Analog
- Dimensions
- 15 × 11.6 × 45.4 mm
- Weight
- 3 g
From the Keyes (generic)'s datasheet, published by Keyes (generic).
Common mistakes
Expecting AO to rise near a flame
AO is inverted: the more infrared reaches the sensor, the lower the voltage (Joy-IT SensorKit, KY-026). Measure the reading with no flame at start-up and treat a drop below it as the flame.
Reading DO LOW as a flame
On the KY-026, DO goes HIGH once the threshold is exceeded (Joy-IT SensorKit, KY-026). The three-pin LM393 flame module works the other way round, so check which board you have before writing the logic.
False alarms from daylight or bulbs
The sensor responds to infrared, which sunlight and incandescent lamps also emit. Shade it, point it away from windows, or turn the potentiometer to raise the threshold until DO stays LOW with no flame.
5 V outputs into a 3.3 V board
With + on 5 V, AO and DO can reach 5 V. On an ESP32, ESP8266 or Pico power the module from 3.3 V instead, as the maker does on the Raspberry Pi (Joy-IT SensorKit, KY-026).
Holding the flame too close
The sensing element sits in plastic epoxy on an open board. Test with the flame a safe distance away rather than touching the sensor, and never leave a test flame unattended.
KY-026 Flame Sensor questions
Does the KY-026 work with 3.3 V boards like the ESP32 and Raspberry Pi Pico?
Yes. Joy-IT powers it from 3.3 V on the Raspberry Pi, micro:bit and Pico (Joy-IT SensorKit, KY-026). Run it from 3.3 V on any 3.3 V board so AO and DO never exceed the GPIO limit, and put AO on an ADC pin.
Is the KY-026 digital output HIGH or LOW when it sees a flame?
HIGH. The LM393 comparator drives DO HIGH and lights LED2 once the infrared level passes the threshold set on the potentiometer (Joy-IT SensorKit, KY-026).
Why does the KY-026 analog value go down when I show it a flame?
The analog output is inverted by design: a stronger infrared signal produces a lower voltage at AO (Joy-IT SensorKit, KY-026). Treat a falling reading as more flame.
Why does my KY-026 detect a flame when there is none?
Something else bright in infrared is reaching it: sunlight, daylight through a window or an incandescent bulb. Shade the sensor and turn the potentiometer to raise the threshold until DO stays LOW in the room with no flame.
How do I use the KY-026 with a Raspberry Pi?
Wire DO to a GPIO and power the module from 3.3 V. The Pi has no analog inputs, so read AO through an I2C ADC such as the KY-053 (ADS1115), as Joy-IT does (Joy-IT SensorKit, KY-026).
KY-026 or the 3-pin LM393 flame sensor: what is the difference?
The KY-026 has both an analog output for a flame level and a digital output that goes HIGH on detection (Joy-IT SensorKit, KY-026). The 3-pin module has only a digital output, which goes LOW when it sees a flame.
Build something with the KY-026 Flame Sensor
- Build this
Flame alarm
Sound a buzzer and light an LED when DO goes HIGH.
- Build this
Fire-fighting robot
Compare AO from several sensors to steer toward the strongest infrared source, then switch on a fan or pump.
- Build this
Candle-out detector
Notice when a candle or burner goes out by watching AO climb back to its rest level.
- Build this
Infrared level logger
Plot AO over time to see how a flame flickers and how distance changes the reading.
This page as plain Markdown, for ChatGPT, Claude or your own agent. /components/flame-sensor-ky-026.md