AS5600 with a Raspberry Pi Pico
12-bit contactless magnetic rotary encoder that reads absolute shaft angle from a diametric magnet over I2C, analog, or PWM.
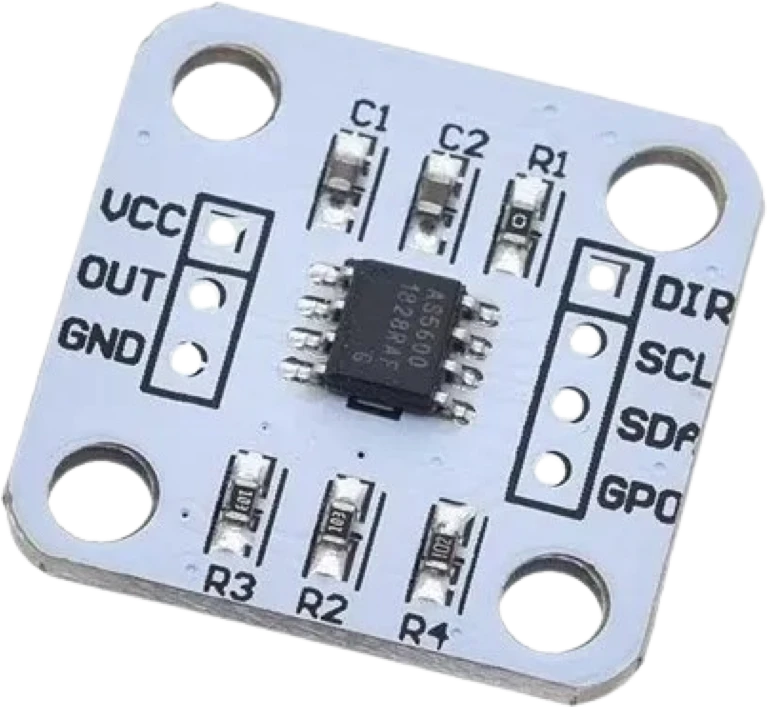
The AS5600 talks to the Raspberry Pi Pico over I2C0 on GP4 (SDA) and GP5 (SCL), the arduino-pico core's default Wire pins, at its fixed address 0x36. The page powers the module from 3V3, which keeps its pull-ups at the Pico's logic level but puts the chip in its 3.3 V mode, so check how your breakout routes VCC.
Wiring the AS5600 to the Raspberry Pi Pico
Pin by pin.
| AS5600 | Raspberry Pi Pico |
|---|---|
| VCC | 3V3 |
| GND | GND |
| SCL | GP5 |
| SDA | GP4 |
What to know on the Raspberry Pi Pico
- The AS5600 has two supply modes: 4.5 V to 5.5 V on VDD5V, or 3.0 V to 3.6 V with VDD5V and VDD3V3 tied together. Breakouts route VCC to VDD5V, so on the Pico's 3V3 confirm yours bridges the two pins before trusting its readings.ams AS5600 datasheet v1-06, pp. 5, 9
- It draws 6.5 mA always on, a small share of the 300 mA Raspberry Pi recommends as the limit for the 3V3 pin.ams AS5600 datasheet v1-06, p. 5; Raspberry Pi Pico datasheet, release 21, p. 8
- Its address is fixed at 0x36. For two encoders on one Pico, put the second on I2C1 with Wire1, since the RP2040 has two I2C controllers.ams AS5600 datasheet v1-06, p. 10; Raspberry Pi Pico datasheet, release 21, p. 4
- The AS5600 also outputs the angle as a voltage on OUT. On the Pico that pin would go to GP26, GP27 or GP28, the only ADC inputs, and must stay within the 3.3 V rail.Raspberry Pi Pico datasheet, release 21, p. 19
AS5600 code for the Raspberry Pi Pico
Compiled for rp2040:rp2040:rpipico on 2026-10-30.
// AS5600 on Raspberry Pi Pico: wiring and a free simulation at https://www.tinkered.ai/components/as5600/raspberry-pi-pico
#include <Wire.h>
#include "AS5600.h"

AS5600 as5600;   // I2C, address 0x36

void setup() {
  Serial.begin(9600);
  Wire.begin();
  as5600.begin();                       // DIR managed in hardware (tied to GND)
  Serial.println(as5600.isConnected() ? "AS5600 connected" : "AS5600 NOT found");
  Serial.print("Magnet: ");
  Serial.println(as5600.magnetDetected() ? "detected" : "none");
}

void loop() {
  float deg = as5600.readAngle() * AS5600_RAW_TO_DEGREES;  // 0..360
  Serial.print("Angle: ");
  Serial.print(deg, 1);
  Serial.println(" deg");
  delay(200);
}
AS5600 on the Raspberry Pi Pico: questions
Does the AS5600 work at 3.3 V with a Raspberry Pi Pico?
The chip does, in its 3.3 V mode (3.0 V to 3.6 V) with VDD5V tied to VDD3V3 (ams datasheet, pp. 5, 9). Many breakouts feed VCC to VDD5V only, so check the board before running it from the Pico's 3V3.
Can I read two AS5600 sensors with one Pico?
Not on one bus: the address is fixed at 0x36 (ams datasheet, p. 10). Use the Pico's second I2C controller (Wire1) for the second sensor, or an I2C multiplexer.
Why does my AS5600 report no magnet on the Pico?
The magnet must be diametric and 0.5 mm to 3 mm above the chip (ams datasheet, p. 33). If isConnected() fails instead, check SDA on GP4 and SCL on GP5.
Keep going
This guide as plain Markdown. /components/as5600/raspberry-pi-pico.md